• Skip to primary navigation
  • Skip to main content
  • Skip to footer

DIY REMEDIES

Radiant Wellness: Empowering Your Health and Beauty

  • Home
  • Recent Articles
  • Remedies A – Z
  • DIY Smoothies
  • Reviews
  • About Me
  • Contact Us

Beauty

How to use Baking Soda for Dark Spots

July 29, 2016 By Sruthika 2 Comments

Dark or brown spots occur due to exposure of skin to the sun and that causes excessive production of melanin which turns the skin to darker. These spots are also known as sun spots (caused due to sun exposure), age spots (caused due to aging) or hyper-pigmentation.

This appears mainly on the areas like face, neck, back, chest, shoulders, hands and legs where it is easily exposed to sun, dirt or impurities and can be seen most commonly in adults of above 40 years. Hormonal imbalance, stress, vitamin deficiency, aging, acne, weak functioning of body parts are some of the factors causing black or dark spots on the skin.

Although these spots are harmless to the skin but make you look unattractive and affect your self – esteem. Don’t panic, there are many natural remedies that are easily available at home to fade away these spots and brighten up your skin with even skin tone.

Baking soda comes first in treating many health and beauty ailments including dark spots. Here are some of its properties that help you to know how it works for fading dark spots and acne scars on the skin.

  • It has an excellent exfoliating property that exfoliates the skin to remove dirt, dead skin cells and excess oil that trapped in the skin pores to remove darkness and roughness to brown spots.
  • It effectively encourages the growth of collagen to get rid of the spots or scars on the skin. This also helps to shed the skin and thus encourages the growth of new skin.
  • It maintains the balance of the pH levels that in turn helps to prevent the bacteria or any other microbes affecting the immune system and causing these spots on the skin.
  • It acts as a drying agent that dries out the skin pores by removing the oil and dirt which are trapped in the skin and clears the age spots and scars.
  • It has skin lightening and bleaching property that lighten up these black spots naturally and leaves you with even skin tone.

After knowing about its properties, want to give a trial to this baking soda for dark spots. Then here are the best and most effective ways of using baking soda to get rid of dark spots.

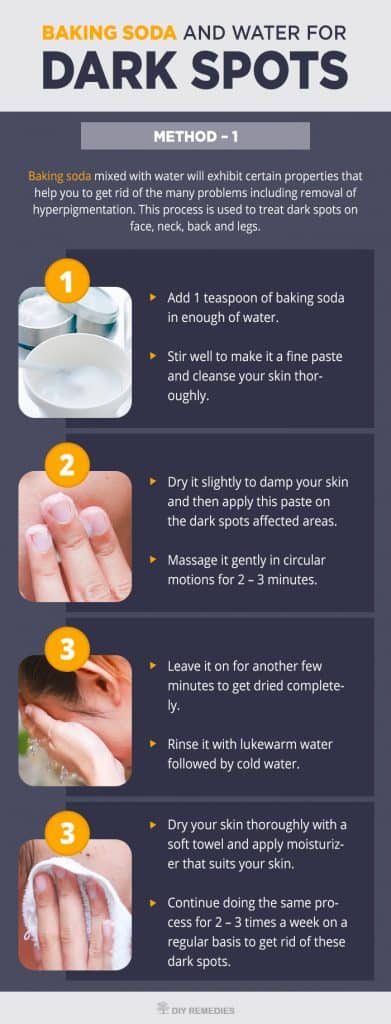
Method – 1: (Baking Soda and Water)

Baking soda mixed with water will exhibit certain properties that help you to get rid of the many problems including removal of hyperpigmentation. This process is used to treat dark spots on face, neck, back and legs.

Steps to be followed…

  • Add 1 teaspoon of baking soda in enough of water.
  • Stir well to make it a fine paste and cleanse your skin thoroughly.
  • Dry it slightly to damp your skin and then apply this paste on the dark spots affected areas.
  • Massage it gently in circular motions for 2 – 3 minutes.
  • Leave it on for another few minutes to get dried completely.
  • Rinse it with lukewarm water followed by cold water.
  • Dry your skin thoroughly with a soft towel and apply moisturizer that suits your skin.
  • Continue doing the same process for 2 – 3 times a week on a regular basis to get rid of these dark spots.

How To Use Baking Soda For Dark Spots

Note:

  • Or add 1 teaspoon of baking soda in 1/4 cup of water. Stir well and apply this mix on the affected areas using a cotton ball at night time before going to bed. Rinse it off in the morning.
  • Or else add some water to baking soda and a little of oatmeal to make it as a scrub paste. Use this to scrub the dark spots or scars affected skin areas.
  • Alternatively, add 3 tablespoons of baking soda in 1 tablespoon of warm water to make it a fine paste. Use this paste to scrub the dark or brown spots on the face by massaging it in gentle circular motions. Rinse it with warm water and dry your skin.

Method – 2: (Baking Soda and Lemon Juice for Dark Spots)

Both lemon and baking soda have natural bleaching and skin lightening property that fades away the spots or scars on the skin and shines it with an even skin tone.

Steps to be followed…

  • Add 1 teaspoon of baking soda and enough of lemon juice in a bowl.
  • Stir it and it starts fizzing for few seconds.
  • Mix well to make a fine paste.
  • Apply this paste on the sunspots affected skin areas.
  • Leave it for few minutes and rinse it off with water.
  • Repeat the same process regularly to get relief from brown spots and scars on the skin.

Baking-Soda-and-Lemon-Juice-for-Dark-Spots
Note: For you’re having dry and sensitive skin then add some water by lessening the quantity of lemon juice in the process.

Tips and Precautions:

  1. Make sure to wash your face and remove any makeup before applying baking soda methods and also before going to sleep at night time to get rid of the problem.
  2. Avoid overusing of baking soda, as it dries out your skin and also, make sure to apply some moisturizer after applying baking soda to prevent dryness, irritation, and itching.
  3. Hydrate yourself with plenty of water, exercise regularly, consume healthy food, do some yoga and meditation to get relief from stress, wear sunscreen while going out, include citrus foods in your diet, etc. to get rid of the dark spots on the skin.
  4. Always it’s recommended to do some skin patch test while using any new ingredient on the skin to know whether it causing any allergic reaction or irritation on the skin.
  5. Never ever rub baking soda vigorously on the skin. In certain cases, baking soda may cause some stinging and itching sensations then wash off the mix immediately on the skin and consult your dermatologist to get relief from these brown spots.

That’s all for now about dark spots and try these baking soda methods to get rid of these spots and to enhance your beauty. But don’t forget to share your experience with us.

Filed Under: Remedies, Skin

How to Get Rid of Dark Spots using Apple Cider Vinegar

July 28, 2016 By Sruthika Leave a Comment

Get Rid of Dark Spots using Apple Cider Vinegar

When your skin got exposed to sun, then they will be an increase in the production of melanocyte cells which in turn results in the raise of melanin in the skin and thus makes the skin to turn darker. These dark patches of the skin are termed as dark spots, age spots, brown spots sun spots or hyper pigmentation.

These spots occurs generally in the exposed skin areas like face, neck, chest, back, shoulders, hands and legs. Other than sun exposure, certain factors like aging, stress, genetics, hormonal imbalance, pregnancy, weak liver functioning, acne, vitamin deficiencies, etc. can also contribute to these dark spots.

However these spots are usually harmless to skin or health but it is concerned as a biggest problem in beauty aspect which makes as unattractive. There are many over the counter treatments and cosmetic creams available in market but the usage of natural remedies at home will help you a lot in clearing the problem without any side effects.

Apple cider vinegar (ACV) is a folk remedy that was suggested by Hippocrates (the father of medicine) for treating many health and beauty ailments including dark spots.

Is apple Cider Vinegar good for Dark Spots?

When you heard that apple cider vinegar for dark spots then a doubt that does it really works for dark spots will appear in your mind. So, here we are providing you with some of its properties to get rid of dark spots.

  • It acts as a drying agent that helps to dry out and fade the dark or brown spots faster.
  • It also cleanse the skin to remove dirt, impurities and other toxins causing damage to the skin and lighten up the skin’s uneven skin tone.
  • It balances the skin’s pH level to clear the brown spots and makes your skin feel fresh and young.
  • It has excellent skin lightening or brightening property that helps to lighten up the scars or dark spots on the skin.
  • It has astringent property that helps to restore the skin’s natural color to fade away those dark spots.
  • It accelerates the process of shedding of skin and helps for its re-growth to fade away the dark patches and leaves your skin with even tone.
  • It has powerful alpha hydroxy acids that remove the dead skin cells and thus reveals a healthier complexion by fading the sun or age spots.
  • It contains essential compounds like amino acids, acetic acid, mineral salts and a wide range of vitamins that helps to reduce the dark spots and other hyper – pigmentation problems.

How to use Apple Cider Vinegar for Dark Spots:

ACV is simply a miraculous ingredient that comes to reduce the appearance of dark patches on the skin that caused due to hyper pigmentation. Here are the best ways of using ACV for fading these dark spots on the skin.

Method – 1: (Apple Cider Vinegar with Water)

Apple cider vinegar when mixed with water will exhibit certain properties that help to fade away the dark spots.

Steps to be followed…

  • Mix equal quantities of apple cider vinegar and water in a bowl.
  • Stir well and apply this mix on the dark spots affected areas.
  • Massage it gently for few minutes and rinse with water after few minutes.
  • Dry the area and continue doing the process for once daily until you get rid of dark spots on skin.

Apple Cider Vinegar and Water for Dark Spots

Note:

  • Or you can also add raw honey to the diluted cider vinegar before applying.
  • Also, use the above mix to rinse the affected areas and wait for 3 – 6 minutes and then rinse it with lukewarm water.
  • Or else you can apply direct apple cider vinegar on dark spots but be sure that it may sting (more for dry and sensitive skin people).
  • Alternatively, mix 1/2 teaspoon of apple cider vinegar in 2 – 3 tablespoons of orange juice. Apply it on brown spots using cotton ball and rinse it off after it dries completely. Repeat it once or twice daily for 4 – 5 weeks.

Method – 2: (Apple Cider Vinegar with Horseradish)

Horseradish herb slows the production of melanin to prevent hyper pigmentation and has excellent skin lightening properties that effectively removes brown or dark spots, freckles and other spots on the skin. This method helps to exfoliate the affected skin area and lighten up the dark spots.

Steps to be followed…

  • Grate finely 4 – 5 inch long of horseradish.
  • Then pour 1/2 cup of organic apple cider vinegar in a bowl.
  • Mix well and keep it aside for about 2 weeks by shaking it once daily.
  • After 2 weeks, strain the mix into a container that has lid.
  • Then apply a small amount of this herb infused vinegar to the dark spots.
  • Leave it on for few minutes and rinse it off with water.
  • Store the remaining mix in refrigerator and use it thrice daily for a month to get relief from dark spots.
  • This combination will not suit for all skin types, so if you’re experiencing any irritation or discomfort then discontinue the process immediately.

Note: Or use some freshly squeezed lemon juice in this method and apply it to get relief from dark spots on the skin.

Method – 3: (Apple Cider Vinegar with Onion Juice)

Onion helps to stop the excess production of collagen to prevent scarring on the skin. both cider vinegar and onion juice has acidic nature and anti-inflammatory property that helps to fade away the brown spots without any irritation.

Steps to be followed…

  • Combine 1 tablespoon each of onion juice and cider vinegar in a bowl.
  • Stir well and apply this mix directly on the dark spots affected areas with the help of cotton ball.
  • Let it sit for 30 minutes or more until it gets dried completely.
  • Rinse it off with water and repeat it daily for about 4 – 6 weeks to lighten up the spots.

Note: Or you can also add a little of honey in the above mix before applying to fade the spots on the skin.

Method – 4: (Apple Cider Vinegar with Lemon Juice)

Lemon juice has citric acid and skin lightening property that helps to brighten up the dark spots on the skin.

Steps to be followed…

  • Mix 1/4 teaspoon each of apple cider vinegar and fresh lemon juice in a bowl.
  • Stir well and saturate a cotton ball at night time for few minutes.
  • Apply this mix with cotton ball by starting at forehead and apply to all over the face and neck.
  • It might cause some stinging sensation and redness at first and must dilute this mix with water before applying, if you have dry or sensitive skin.
  • Leave it on for overnight and rinse it off with water.
  • Wear sunscreen daily after this application, as it makes your skin more sensitive to sun exposure.
  • Do the same process on every night before going to bed to get rid of the dark spots.

Tips and Precautions:

  1. Always use raw, organic, unfiltered and unpasteurized apple cider vinegar with the mother content in it, to get rid of the dark spots on the skin.
  2. Intake of apple cider vinegar internally will help to clear these spots or scars on the skin. Mix 2 teaspoons of ACV and some raw honey in 1/2 glass of warm water. Drink this solution for twice daily (morning and night times) till you observe the improvement of fading the brown spots.
  3. Dry and damaged skin is one of the causes for darkening the skin. So, moisturize it well to keep it hydrate and repair the damaged skin.
  4. Regularly use apple cider vinegar as a natural skin toner (dilute 2 parts of water to 1 part of ACV) and rub it all over the dark spots.
  5. You can also add few drops of any essential oil to soften the strong ACV smell and apply it to prevent brown or dark spots.
  6. Drink plenty of water, have a healthy and balanced diet, remove any make-up before you go to sleep, apply sunscreens regularly, consume antioxidant rich foods, do yoga and meditation and a little of skin care hygiene will help you to get healthy skin tone without any spots or scars.

Are you concerned about these unsightly dark spots or scars on the skin? Just simply follow these ACV methods to clear the spots on the skin and to look pretty and attractive. But feel free to share your experience with us.

Filed Under: Dark Spots, Remedies, Skin

How to Get Rid of Acne Scars using Baking Soda

July 27, 2016 By Sruthika Leave a Comment

Get Rid of Acne Scars

Get Rid of Acne Scars

Acne – a inflammatory skin infection caused due to dirt, sebum (Oil), dead skin cells and other toxins clog the skin pores then the impurities gets trapped beneath the skin and thus results in acne breakouts. It affects on face, neck, back, chest and legs.

The main reasons for acne are hormonal imbalance, poor diet, poor hygiene and other factors. So, there are many natural remedies that heal these breakouts. After it gets healed completely, they leave scars by destroying the healthy skin tissue and these are hard to remove from the skin which is called as acne scars.

Other than using expensive anti-scar creams which are filled with chemicals (leads to unwanted side effects in long run), use natural remedies that are easily available at home along with cost effective and gives long lasting results of removing scars on the skin.

Baking soda is one among those natural remedy that effectively reduces the appearance of stubborn acne scars on the skin. It is not only used for cooking or cleaning or deodorizing but also used to treat the acne and its scars on the skin.

Does Baking Soda works for clearing Acne Scars?

Here are some of the baking soda properties that help you to know how it works for removing those stubborn scars.

  • Baking restores the natural skin’s pH balance to fade away the acne scars and other scars on the skin by eliminating the bacteria from clumping.
  • It exfoliates the skin to remove dirt, excess oil and dead skin cells that get trapped in the skin pores to fade away the acne scars.
  • It has an excellent natural bleaching and lightening property that helps to fade the acne scars on the skin and lighten up the skin tone.
  • It encourages the growth of collagen to fill the indented acne scars which in turn helps in shedding the skin and also encourages the growth of new skin cells.
  • It has anti-inflammatory property that soothes the irritation and red marks of acne scars. It gently scraps the scar tissue layer by layer to remove acne scars.
  • The bacteria still remains in the acne affected areas (even though the acne cured completely). So, the usage of baking soda will prevent bacteria with its antibacterial and antiseptic properties without causing acne again in those areas.

After knowing about baking soda properties, want to know how to use baking soda for acne scars. Then here are best ways of baking mentioned below. All you have to do is to use the best baking soda and follow these methods regularly to diminish those scars on the skin.

Method – 1: (Baking Soda Face Mask for Acne Scars)

When baking soda mixed with water then it exhibit various properties that clear many skin problems, including acne scars.

Steps to be followed…

  • Add 2 tablespoons of baking soda in 1 tablespoon of water.
  • Stir well to make a fine paste and apply this paste on the face as a face mask.
  • Be sure to concentrate more on the scars affected facial areas while applying.
  • Gently massage the area for 2 – 4 minutes in a circular motion.
  • Leave it on for about 7 – 10 minutes and rinse it off with lukewarm water.
  • Dry the skin and regularly follow the same process for twice a week.

How-to-Get-Rid-of-Acne-Scars-using-Baking-Soda

Note:

  • Or simply use a cotton ball to dab the baking soda – water mix on all over the face. Leave it on for overnight and rinse it off in the next morning. Follow this baking soda for acne scars overnight process regularly.
  • Or else use dry baking soda directly on the clean and dry acne scars areas. Rinse it off after 15 – 20 minutes to get rid of acne scars.

Method – 2: (Baking Soda with Lemon Juice)

Lemon juice has vitamin C and natural bleaching property that triggers the collagen production to keep the skin firm and smooth. This method effectively cleanses the impurities and helps for the formation of new skin cells to fade acne scars.

Steps to be followed…

  • Add 2 teaspoons each of baking soda and fresh lemon juice in a bowl.
  • Stir it well and cleanse the acne affected areas.
  • Dry it and apply this mix on those areas.
  • Let it sit for few minutes until dried completely.
  • After that, rinse if off with water and dry the area.
  • For more effective results, massage the area gently with lukewarm olive oil.
  • Again leave the oil on the skin for about an hour or two.
  • Finally, rinse with lukewarm water and pat dry the skin.
  • Continue doing the same process twice a week to get rid of the acne scars on the skin.

Baking Soda with Lemon Juice For Acne Scars

Method – 3: (Baking Soda Paste with Honey)

Honey has natural moisturizer and soothes the skin to reduce the inflammation that leads to more severe acne scars. Both have antioxidant property that repairs the damaged skin to fade these scars.

Steps to be followed…

  • Add 2 tablespoons of honey in 1 tablespoon of baking soda.
  • Stir well and wet your skin where you’re having acne scars.
  • Massage it gently for few minutes in circular motions.
  • Allow it to sit for about 5 minutes and then rinse the area with lukewarm water.
  • Dry the skin thoroughly and repeat the same process for twice a week until you cleared acne scars.

Baking Soda with Honey Paste for ACNE Scars

Method – 4: (Baking Soda Scrub with Olive Oil)

Olive oil restores the skin’s oil balance to prevent dryness and greasiness along with repairing the damaged skin. This method is very effective in exfoliating the skin to remove the toxins from pores and lightens up the scars.

Steps to be followed…

  • Add equal quantities of baking soda and olive oil in a bowl.
  • Stir it well to make a fine paste and wash and dry your face.
  • Apply this paste on the wet skin and start scrubbing it in circular motion for 3 – 5 minutes.
  • Then soak a clean washcloth in this warm water and use it wipe it off the paste.
  • Finally rinse the area with cool water and dry the skin.
  • Repeat the same for 3 times a week.

Baking Soda Scrub with Olive Oil For Baking Soda with Lemon Juice For Acne Scars

Note:

  • Alternatively, prepare a paste by mixing baking soda and castor oil. Apply this paste on the acne scars affected skin and rinse off after few minutes.
  • Or else you can also add 2 drops of tea tree oil in the baking soda – olive oil mix and apply it on the scars. Massage gently and rinse off, dry the skin and apply natural moisturizer.
  • Or use virgin coconut oil instead of olive oil in the above process.

Method – 5: (Baking Soda with Hydrogen Peroxide)

Both baking soda and hydrogen peroxide has bleaching properties that lighten up the skin scars.

Steps to be followed…

  • Add baking soda in enough of hydrogen peroxide.
  • Stir it well till the foam disappears completely.
  • Then apply this on the acne scars and scrub it gently for few minutes.
  • It would be best to do the process before taking your shower.
  • Do the same process for at least once a week till you cleared acne scars on the skin.

Note: Be sure to do some patch test before using it regularly and also use only 3% of hydrogen peroxide for treating any skin problem.

Do’s and Don’ts:

  1. Regular usage of baking soda will dry the skin. So, it’s better to use some natural moisturizer after its application to prevent acne scars and the dryness.
  2. It’s always recommended to do some skin patch test before using baking soda on regular basis.
  3. Never ever rub baking soda vigorously on the skin as it causes dryness and damage to the skin.
  4. For best results, you have to use these baking soda methods at night time before going to bed, as the cell regeneration is enhanced at night time more than day time.
  5. If you’re experiencing any itching or burning sensations after applying baking soda on the skin (especially on sensitive skin) then wash it off the area immediately.
  6. Consult your dermatologist if you didn’t get relief from scars on the skin to know about the safe over the counter treatments as per your skin type.
  7. For fading acne scars and spots on skin, you should require a very consistent effort along with patience and regular applications without any fail.
  8. You can also add some baking soda in your facial cleanser and use this mix to cleanse your face using circular motions and rinse well.

That’s all for now about Baking Soda for Acne Scars. Hope you’ll try these methods and share your experience with us.

Filed Under: Acne, Remedies

How to Get Thick and Long Eyelashes with Coconut Oil

July 25, 2016 By Sruthika 6 Comments

Long and thick eyelashes will make a person’s eyes look more beautiful and attractive. Eyelashes not only draw attention to the eyes but also protect them from dust, allergens and other debris from falling into the eyes by simply acting as sensors.

Perfect length of eyelashes will help to control the airflow and the rate of evaporation on the surface of the cornea which in turn helps to keep the eyes moist for a longer time and keep the dust particles away. So, it has been proved that longer eyelashes are not only for beauty conscious but also related to health.

But due to certain factors like age, nutritional deficiency, genetics, hormonal imbalance, certain medical problems, eye infections, rubbing the eyes roughly, sleeping without removing eye makeup, etc. will delicate the lashes to fall off and make them thin.

Are you suffering from thin eyelashes? Do you want to grow them naturally without using cosmetic methods (like mascara or fake eyelashes)? Then you are at the right place. Here in this article, you can regrow your eyelashes effectively.

Coconut oil is the best natural remedy for promoting both eyelashes and eyebrows growth. It makes the eyelashes look bolder and thicker without harming your eyes. Always look for cold pressed virgin coconut oil for healthy eyelashes and regular follow up of this coconut oil will definitely make you observe before and after coconut oil use for eyelashes.

Why Coconut Oil?

Still, have a doubt – how does coconut oil promote longer eyelashes? Here we are providing some of its properties that clarify your doubts and thus make you try this oil for longer and thicker eyelashes.

  • Coconut oil is natural oil that can be safely used around the eyes including lashes. Unfortunately, if this oil gets into the eyes, then also it won’t cause any harm to eyes or vision, unlike the usage of cosmetic products.
  • It acts as a natural moisturizer to the lashes (just like it does to hair) to prevent the dust and allergens getting into the eyes.
  • It contains medium-chain fatty acids like lauric, caprylic, capric and myristic acid which are meant to be essential building blocks for every cell including eyelashes in the human body.
  • It is composed of vitamin E, minerals and other essential nutrients that moisturize the area and stimulate the growth of eyelashes.
  • It penetrates the eyelash follicles to stimulate its hair growth. It is a non – comedogenic that helps not to clog the skin pores.
  • It is very capable of fighting against the hair related issues like dandruff, itchiness, and other fungal infections in which some people will get them on their lashes.
  • It provides a natural lubricant to the eyes and also acts as a cosmetic that makes the lashes soft and shine.
  • It strengthens the lashes to prevent them from falling or breaking and thus promote its growth.

How to use Coconut Oil for Eyelashes:

Long, thick and lush eyelashes are the dream for every woman and coconut oil will definitely fulfill their dream or desire of having long and shiny eyelashes. All you have to do is to follow the below mentioned best coconut oil methods.

Method – 1: (Coconut Oil Eyelash Serum)

DIY coconut oil eyelash serum is a natural cosmetic that makes the best usage of coconut oil for eyelashes growth. Coconut oil acts as a natural pulling agent that draws out the impurities and make the eyelash follicles to stimulate regrowth. Lemon oil helps for cleansing and stimulating the growth whereas lavender oil nourishes the lashes and follicles.

Steps to be followed…

  • Pour virgin coconut oil into roller bottle till it filled up to 1/4 inch from the top of the bottle.
  • Then add 1 drop each of lemon essential oil and lavender oil in this coconut oil.
  • Stir well and push the roller lid on the top of the bottle.
  • Shake it well to make the serum ready to use.
  • Apply this serum to your eyelashes with the roller ball of the bottle at night before bedtime to prevent greasy looking for daytime usage.
  • Usage of roller ball will help to keep the eyes from being contaminated. So, use roller ball rather than touching with your fingers.
  • Be sure that to blot your lashes with a clean cloth, if there is too much oil on your eyes.
  • Make sure that there won’t be any oil dripping into the eyes.
  • Let it sit for overnight to make the lashes feel well moisturized and rinse it off in the next morning.
  • Continue applying this oil serum daily at night time till you achieved the desired results of long and thicker eyelashes.

How to use Coconut Oil for Eyelashes:

Note:

  • Be sure to cleanse your face with coconut oil based soap and water and dry it with a clean and soft cloth.
  • Skip using any other eyelash products or serums or any other eye creams while using this natural oil serum.
  • This recipe is used as a mascara remover by just applying this serum with a clean cloth and then rinse your eyes thoroughly with water.
  • Alternatively, mix 2 – 4 drops of lavender oil in 1/2 teaspoon of coconut oil. Stir well and apply this mix on the eyelashes (from roots down to the ends) with a cotton swab.
  • Or melt 1 tablespoon of coconut oil and add fresh lemon juice (1/4 lemon) and 1 teaspoon of lavender oil in it. Stir well and let it sit for few minutes. Pour this mix into an airtight glass jar. Apply it to the clean eyes by using a clean mascara brush. Massage gently and leave it for overnight. Repeat regularly.

Method – 2: (Coconut Oil)

Coconut oil alone can be used effectively to grow your eyelashes. It provides strength and thickness to eyelashes.

Steps to be followed…

  • Dip a clean cotton swab in virgin coconut oil.
  • Dab it on the eyelashes and massage it gently with your fingers by closing the eyes – downside and opening your eyes – upside.
  • Leave for a few hours and then wash your face with water.
  • Be sure that not to apply too much oil on the lashes.
  • Repeat the same process regularly.

Also, Read How to Grow Eyebrows using Coconut Oil

Method – 3: (Coconut Oil with Other Carrier Oil)

Due to many reasons like the weakening of the skin tissues around the eyes, lack of nutrition, etc. eyelashes will fall out or disappear. If left like that, it might lead to sloppy skin and makes it hard for eyelashes to stick. So, to clear this problem, use a combination of coconut oil with other carrier oils.

Steps to be followed…

  • Add a few drops of castor oil and grapeseed oil in 1/2 teaspoon of coconut oil.
  • Stir well and apply this oil mix onto the eyelashes.
  • Let it sit for about an hour or two and then rinse off with water.
  • Dry the area and repeat it daily for few weeks to obtain best results.

Method – 4: (Coconut Oil Eyelash Extensions)

This homemade eyelash growth serum contains castor oil (natural source of Omega – 6 fats, vitamins, and proteins that promote hair growth), emu oil (moisturizes and nourishes), vitamin E oil (enhance strong hair growth) and coconut oil that helps for healthy, shiny, long and lustrous eyelashes.

Steps to be followed…

  • Add 1 teaspoon each of castor oil and emu oil, vitamin E oil from 2 capsules and 1/2 teaspoon of coconut oil in a small dropper bottle.
  • Stir all these ingredients in the bottle.
  • Squeeze a drop or two of this serum onto your finger or cotton swab.
  • Dab it on eyelashes and massage it gently on the lash line at night time.
  • Leave it on for overnight and wash it off in the next morning.
  • Use this eyelash growth serum daily for best results.

Tips and Precautions:

Here are some additional tips and precautions to follow for getting longer and luxuriant eyelashes.

  1. Avoid wearing fake eyelashes with an adhesive, as it may cause some allergies or irritation to the eyes (especially to contact lenses wearers).
  2. Application of cosmetics around the eyes will make them red and irritated but the usage of coconut oil won’t cause any harm to eyes and helps for the growth of eyelashes when applied around the eyes on a regular basis.
  3. Wash your eyes at night before sleeping to remove the makeup, dust and also to relieve the stress on your eyes which in turn help for the growth of lashes.
  4. Make sure to toss out your old mascara, as it grows bacteria after usage of 3 – 4 months of time.
  5. If the coconut oil gets into your eyes than your vision may go blurry for a couple of minutes but won’t cause any harm to your eyes or the eyesight.
  6. Remember that coconut oil acts as a natural lubricant to the eyes and a non – comedogenic that won’t clog the skin pores and make you glow naturally.
  7. Coconut oil is natural and safe when used in a moderate amount, it won’t cause any side effects or skin interactions.
  8. You can use coconut oil as your eye makeup remover or treating eye related problems like pink eyes, itchy eyes and red eyes.
  9. In a study, it is found that coconut oil is the best one that reduces the protein loss of hair and thereby prevent it from getting dry and damaged. The fatty acids in coconut oil will prevent breakage and enhance healthy hair growth when compared to other oils.

Have you ever tried coconut oil as a natural remedy for growing eyelashes? If not, give a trial to this oil rather than harmful cosmetics or creams. Share your experience with us.

FAQ’s?

Are there any side effects of using mascara or fake eyelashes?

Yes, either using mascara or fake eyelashes will result in drying out the eyelashes and thereby make it look thin. The regular usage of mascara will break the eyelashes and make them fall over time and coming to fake eyelashes, the glue or adhesive used to apply fake eyelashes may cause allergies or irritations on the sensitive skin of your eyes.

Over time, the usage of eyelash extensions will cause falling out your real lashes. So, go natural and use coconut oil methods to grow your eyelashes.

How to choose and select the best quality coconut oil?

Coconut oil is enriched with essential saturated fats, vitamins, and antioxidants that make it versatile and used as the best remedy for treating various health and beauty problems. Refined coconut oil doesn’t have the health benefits as a pure form of coconut oil has.

So, always choose organic, unrefined, cold pressed virgin coconut oil for eyelashes growth. You can easily find this virgin coconut oil from your grocery stores or health stores or online stores.

Are there any side effects of using coconut oil on the eyes?

No, it won’t cause any side effects or interactions on the skin. In rare cases, especially to those who are hypersensitive may get any allergic reactions upon applying coconut oil. It is natural and safe to apply even on the sensitive skin areas like eyelashes.

Filed Under: Beauty, Remedies

How to Grow Thick Eyebrows with Coconut Oil

July 22, 2016 By Sruthika Leave a Comment

Thick and well-shaped eyebrows are always trendier, so everyone wants to maintain them (especially celebrities) to enhance their look. While the thin and sparse eyebrows will make you look aged and dull.

Over plucking, threading, aging, poor cosmetic products, nutritional deficiencies, shave or waxed, stress and some health problems and medical treatments like radiation, eczema, hypothyroidism, chemotherapy, etc. will cause hair loss including the eyebrow line.

Don’t get worried about it, fortunately, there are many natural ways to make your eyebrows grow thick and look attractive. Coconut oil is one such natural remedy used to grow your eyebrows thick.

Coconut oil works in two ways for promoting healthy eyebrows growth like preventing more eyebrow loss and aiding the growth of more hair in eyebrows. It also stimulates the hair growth to grow back dense and impressive eyebrows. Have a look on how it works for eyebrow growth.

  • It has many essential proteins and nutrients (like vitamin E and iron) that promote the healthy, thick and dark eyebrows.
  • It is rich in vitamin E and many essential saturated fatty acids which are essential for healthy hair growth.
  • The lauric acid in the oil acts as an antimicrobial agent that prevents the infection of hair follicles and thus protect the brows from further damage and stimulate them to grow quickly.
  • It moisturizes and conditions the brow hair to grow back out healthy and thicker. It won’t affect the hormonal balance of your body in any way, unlike many other hair growth serums which are packed with a lot of chemicals.

How to use Coconut Oil for Eyebrows:

Everyone is having a desire of thick eyebrows and long eyelashes. Coconut oil will definitely help you to fulfill your desire and make you look beautiful. Here we are presenting you the best coconut oil methods for enhancing the growth of your eyebrows.

Method – 1: (Coconut Oil)

Coconut oil is an excellent remedy for growing the thick and dark eyebrows.

How-to-Grow-Thick-Eyebrows-with-Coconut-Oil

Steps to be followed…

  • Place few drops of warm coconut oil onto your fingertips.
  • Apply this oil on the clean eyebrows and massage it gently for few minutes.
  • This process is used to boost up the blood circulation, which is essential to stimulate the healthy hair growth.
  • Leave it on for few hours or overnight.
  • After that, rinse your eyebrows and face with lukewarm water.
  • Dry the skin and continue doing the same process regularly to thicken up your eyebrows.

Note:

  • Or simply dip a Q-tip or cotton swab in cold pressed coconut oil and apply it on your eyebrows after cleansing and drying your face.
  • Make sure to concentrate more on the areas where you’ve waxed or over plucked.

Method – 2: (Coconut Oil with Fenugreek Seeds)

Fenugreek is rich in nicotinic acid and lecithin that helps to promote hair growth. The protein content in both coconut oil and fenugreek will help to rebuild the hair follicles.

Steps to be followed…

  • Soak 1 teaspoon of fenugreek seeds in water for about 5 – 7 hours.
  • Then grind these soaked fenugreek seeds to make a thick paste.
  • Now add 1/2 teaspoon of organic coconut oil in this paste.
  • Stir well and apply this paste on the eyebrows but be sure that this paste should not get into the eyes.
  • Let it sit for overnight and rinse off in next morning with warm water.
  • Regularly follow the same process for 3 – 4 times a week to get dense and dark eyebrows.

Method – 3: (DIY Coconut Oil Hair Growth Serum)

Coconut oil will nourish and bring a new life to the eyebrows and eyelashes. Castor oil has omega – 6 that effectively help for hair re-growth. Almond oil moisturizes the hair and skin and thus prevents it from falling. Avocado and vitamin E oil adds an extra boost to this hair growth serum.

Steps to be followed…

  • Add 2 tablespoons each of castor oil, coconut oil and sweet almond oil in a small, clean container.
  • Then add 1/2 teaspoon of avocado oil and vitamin E oil pinched from 1 vitamin E capsule in the container.
  • Shake it well till all these ingredients are mixed properly.
  • Now dip a clean Q – tip in this serum mix and apply it gently on your eyebrows and eyelashes at night time.
  • Leave it on for overnight to make it strong, longer and healthier.
  • But be sure to check whether the ingredients used in this serum are allergic to you or not and then try it regularly till you attained the best results of healthy, thick and dark eyebrows.

Castor Oil used to Grow Eyelashes

Note: Or else mix coconut oil and castor oil and apply this mix on the eyebrows to get dark and dense hair growth on your eyebrow area.
Method – 4: (Coconut Oil with Lemon)

Lemon has rich content of vitamin C, B, folic acid and other nutrients that promote the eyebrow hair’s growth.

Steps to be followed…

  • Place the sliced pieces of 1 lemon in 1/4 cup of coconut oil.
  • Allow the mix to sit for at least 15 days in a cool and dry place.
  • Then apply this mix to your eyebrows by using a cotton ball at night time.
  • Let it sit for overnight and rinse it off in the next morning.
  • Do the same process regularly to enhance your eyebrows.

Coconut Oil with Lemon For Eyebrows

Note:

  • It’s best to avoid exposing of your eyebrows to direct sunlight for 2 hours after using lemon why because it lighten up the hair color.
  • Or simply add some Vaseline in the above lemon – coconut oil mix before applying, especially those who have dry or sensitive skin.
  • Alternatively, mix some Vaseline in warm coconut oil and apply this mix to your eyebrows at night time. Massage it gently for few minutes and rinse with warm water in the morning.

Tips and Precautions:

  1. The 3 most important things to be done regularly for healthy and thick eyebrow growth is to exfoliate (coconut oil + sugar mix) the skin around the eyebrows to remove dead cells, apply coconut oil to condition and moisture the brow line and finally massage the hair follicles under the eyebrows in circular motion to increase blood circulation and promote hair growth.
  2. Avoid scratching or rubbing or plucking or waxing your eyebrows or pressing eyebrows too hard with an eyebrow pencil.
  3. Always prefer to use organic, cold pressed and virgin coconut oil rather than normal coconut oil to get rid of the problem.
  4. Reduce your stress levels, consume healthy diet, sleep for at least 6 hours daily and hydrate yourself to have thick and lush eyebrows.
  5. Wash your eyes including eyebrows to remove any dust or makeup at night time before going to sleep.

Hope you’ll give a trial to these coconut oil methods for thick and beautiful eyebrows. Let me know which one worked well for your eyebrows growth by sharing your experience with us.

Filed Under: Beauty, Remedies

How to Soothe Eczema with Baking Soda

July 20, 2016 By Sruthika Leave a Comment

Are you suffering from dry or rough patches on the skin? Is it causing any irritation, itching or inflammation of the skin? Then you may be suffering from eczema.

What is Eczema?

Eczema or atopic dermatitis is a recurring skin inflammation that is caused due to the skin sensitivity, dry and itchy skin, genetics, stress, allergies, irritants, hormonal changes, poor diet, etc. that may damage the skin and creates a red, rough and raised patches on the skin (especially to your little ones). These flakes will appear in the visible places like on the face, behind ears, on the scalp, on hands and feet, wrists, and all over the body.

However, there is no complete cure for eczema but you can manage its symptoms effectively with the help of some natural home remedies and daily skin care. The reason why I choose natural remedies rather than over the counter medications is that they are safe, moisturize and cure the problem naturally with simple home ingredients like baking soda.

Why Baking Soda?

Baking soda or sodium bicarbonate is a most common household ingredient used for treating various health, skin and beauty ailments, including eczema. Also, remember that baking powder and baking soda are not the same they are different. You have to use baking soda but not the baking powder for treating eczema and its symptoms.

Here we are going to learn all about its properties and methods on how to ease eczema with baking soda.

Can we use Baking Soda for Eczema?

Still in the confusion that does baking soda works for treating eczema? Then have a look at some of its properties that help you to get rid of eczema flare-ups on the skin.

  • It has natural antiseptic and skin cleansing properties that cleanse and clear the bacteria or other germs on the skin and thereby reduce eczema and its symptoms.
  • It balances the pH levels of the skin by alkalizing the body to prevent further flare-ups.
  • It has a soothing effect that reduces the rashes and inflammation caused on the irritated part of eczema affected skin areas.
  • It gently exfoliates the skin to remove dead cells on skin’s surface to reduce the itching and irritation of eczema affected skin areas.
  • It effectively detoxifies the skin and strengthens the skin to prevent any further flare-ups.
  • The gentle foaming action of baking soda helps for deep cleansing of sensitive eczema spots (or dyshidrotic eczema).
  • Baking soda is safe to use eczema remedy (if taken in limited quantities) regularly, even for children also.

How to use Baking Soda for Eczema:

Most people (or patients) are experiencing some soothing relief from eczema by using baking soda. There are several ways of using baking soda for treating eczema flare-ups, but the most commonly used methods are explained below. Have a look on it and try these methods to get rid of eczema.

Method – 1: (Baking Soda Bath)

Baking soda helps to relieve you from itching by balancing the pH levels of the body. Bath or soak will definitely help you in clearing the problem, especially in the areas where we can’t apply easily.

How-to-Soothe-Eczema-with-Baking-Soda

Steps to be followed…

  • Add 1/2 – 1 cup of baking soda in a tub of lukewarm water.
  • Stir well and soak for about 10 – 15 minutes, so that your skin will absorb that water.
  • After that, rinse your body with normal water and dry the skin thoroughly.
  • Repeat the same process to get rid of eczema along with its irritation.

Note:

  • Or mix some ground oatmeal or salts (Mediterranean sea salt and Epsom salt) to this baking soda bath before soaking to get rid of irritation and itching along with clearing the dead cells on the skin’s surface.
  • Or simply add 3 tablespoons of extra virgin olive oil, 1/4 cup of baking soda and 1/2 cup of finely ground oats in a bathtub. Stir well and soak for few minutes. Rinse the body with normal water and pat dry the skin.

Method – 2: (Baking Soda Paste for Eczema)

Even the topical application of baking soda as paste will help to clear eczema. This process is used to treat eczema itch, redness, irritation and eczema scars on the skin (even for babies).

Steps to be followed…

  • Mix baking soda and warm water in such a ratio that it becomes thick and heavy consistency (mud-like paste).
  • Apply this paste directly on eczema flare up.
  • Let it sit for about 5 – 7 minutes and rinse it off with water.
  • Dry the skin thoroughly and apply a moisturizer that suits your skin type to seal in the hydration.

Baking Soda Paste for Eczema

Method – 3: (Baking Soda with Apple Cider Vinegar)

Apple cider vinegar has immune-boosting abilities, riboflavin, mineral salts, vitamin B1, acetic acid and all other essential nutrients to relieve you from itching, dryness along with the reduction of eczema. So, this combination is very effective in treating eczema and its symptoms.

Steps to be followed…

  • Combine 1/2 tablespoon of baking soda, 2 tablespoons of apple cider vinegar in 1/2 cup of water.
  • Stir well and be sure that it will fizz while mixing it.
  • When it gets stopped, drink this mix and if you prefer, you can add a little of honey or lemon in this water before drinking.
  • Regular intake of this drink will definitely help you to get relief from the problem.

Note: Or you can also add 1 teaspoon of raw honey in this mix to enhance its taste.

Method – 4: (Baking Soda with Neem Oil)

Neem oil helps to prevent the itching and irritation caused by eczema. Baking soda helps to balance the pH levels of the skin. So, this combinational process is very effective in getting rid of eczema.

Steps to be followed…

  • Pour few drops of neem oil in baking soda.
  • Stir well to make a fine paste and apply it to eczema affected skin areas.
  • Leave it on for few minutes and rinse it off with water.
  • Dry the skin and apply your regularly used moisturizer to prevent the dryness caused due to baking soda – neem paste on the skin.

Method – 5: (Baking Soda for Scalp Eczema)

Baking soda treats scalp eczema or seborrheic dermatitis balances the pH levels of the scalp and makes it a less hospitable for the microbes causing infection.

Steps to be followed…

  • Add 1 teaspoon of baking soda in 1/2 cup of water.
  • Stir well and apply this mix to all over the scalp but concentrate more on eczema affected scalp areas.
  • Let it sit for 5 – 10 minutes and rinse the hair with water thoroughly.
  • After that, again wash your hair with diluted apple cider vinegar (vinegar mixed with water) to ensure that natural acidity of skin/scalp is restored.
  • Repeat the same regularly until you cleared eczema on scalp.

Method – 6: (Baking Soda Soak or Compress)

Baking soda works well in neutralizing the skin’s pH levels and thereby relieves your itching, irritation, and inflammation on eczema affected skin areas.

Steps to be followed…

  • Mix 1 ½ cups of baking soda in 3 gallons of water and stir well.
  • Soak a clean washcloth in this baking soda water for a couple of minutes.
  • Take out and wring to remove excess water.
  • Place it on eczema affected skin areas and leave for a few minutes.
  • Regular application of this mix on the itchy skin will definitely give a quick relief from eczema flare-ups.

Tips and Precautions:

  1. Baking soda is a natural salt like mineral and when it gets mixed with any acidic material then there will be a chemical reaction occurs that produces carbon dioxide bubbles with a lot of fizzy. So, don’t get confused when this reaction occurs.
  2. For more effective results, apply coconut oil as a natural moisturizer after having baking soda bath and drying the skin thoroughly.
  3. Always use baking soda but not baking powder (as both are different) for treating any health or beauty problems, including eczema.
  4. It’s recommended to do some skin patch test before using baking soda for treating eczema, as everyone’s skin texture is not the same, especially those who have sensitive skin.
  5. Be sure that not to swallow the bath solution (especially for children), as the sodium content may cause other health problems. Also, avoid using baking soda on eczema if you’re suffering from diabetes, as with a tendency to develop any infection or bleeding on small cuts or wounds.
  6. Using baking soda will treat not only eczema but also diaper rash for your babies and young children.
  7. Consult your doctor if you didn’t find any relief from eczema after using baking soda for few days for immediate diagnose and treatment.
  8. Baking soda when mixed with an acidic material then it produces a lot of fizzy carbon dioxide bubbles which makes it to use for baking and to add lightness and texture to many dishes.

Have you ever used baking soda for treating your eczema? Or do you any other baking soda methods? Then share your experience with us in the below comments section.

Filed Under: Remedies, Skin

« Previous Page
Next Page »

Footer

DIY Remedies is a participant in the Amazon Services LLC Associates Program, an affiliate advertising program designed to provide a means for sites to earn advertising fees by advertising and linking to amazon.com.

  • Home
  • Affiliate Disclosure
  • Disclaimer
  • Terms and Conditions
  • Privacy Policy
  • About Me
  • Contact Us
Copyright © 2020 · DIYRemedies.org