• Skip to primary navigation
  • Skip to main content
  • Skip to footer

DIY REMEDIES

Radiant Wellness: Empowering Your Health and Beauty

  • Home
  • Recent Articles
  • Remedies A – Z
  • DIY Smoothies
  • Reviews
  • About Me
  • Contact Us

Skin

Best Honey Face Masks for Skin Problems

October 31, 2016 By Sruthika Leave a Comment

Best Honey Face Masks for Skin Problems

Raw honey is an amazing ingredient that widely used to treat many health and beauty problems. It exhibits several properties like antibacterial, antiseptic, anti-inflammatory and skin soothing properties.

It has natural hydrating and moisturizing properties. It also contains rich content of vitamins B1, B2, B3, B6 and C along with zinc and iron that helps to protect the skin from many problems like dryness, burns, rashes, attack of free radicals, acne, etc.

Honey treats any skin care ailments ranging from acne to eczema and also suitable for the people of all skin types. So, here we covered 3 best honey face masks for treating dry skin, dark spots and wrinkles.

Face Mask – 1: (For Dry Skin)

The essential fats in avocado and lactic acid in yogurt will deeply moisturize the skin. This combination provides essential nutrition like vitamins (A, B, D, E) and minerals (calcium, copper, manganese, zinc and magnesium) to the skin.

  • This mask refines the pores and moisturizes your skin to make it smooth.
  • Mix 1 teaspoon each of mashed avocado, plain yogurt and raw honey in a bowl.
  • Stir well till you get a smooth paste.
  • Apply it all over the face and leave it for 20 – 30 minutes.
  • After that, rinse off with water and dry your skin.
  • If you’re having too much of dry skin, then apply moisturizer to your face.
  • Repeat this gentle mask regularly to get rid of dry skin.

Note:

  • Or else, mix 1 tablespoon of honey in 1 ripe mashed avocado. Apply it on the face and rinse off with water.
  • Or mix 1 tablespoon of organic coconut oil in 2 tablespoons of raw honey. Spread it on the face and massage gently for few minutes. Rinse it after 15 minutes.

Mask – 2: (For Dark Spots and Scars)

Lemon exfoliates the skin to dead cells, oil and other impurities and also lightens your skin to fade dark spots and scars. Honey heals the damaged skin and minimizes the scars with its essential nutrients and natural moisturizing property.

  • Mix 1/2 teaspoon of fresh lemon juice in 2 teaspoons of raw honey.
  • Apply it on the face and rinse off after 20 – 30 minutes.
  • Continue applying these masks regularly to get relief from dark spots and scars on the skin.

Mask – 3: (For Wrinkles)

Honey hydrates the skin and locks the moisture level which tightens the skin to prevent wrinkles and fine lines. Oatmeal will exfoliate the skin to remove dead cells. This combination is used to enhance the collagen production and prevent wrinkles.

  • Mix 1 tablespoon each of oatmeal and honey in a bowl.
  • Spread it on the face and massage gently for few minutes.
  • Let it sit for about 15 – 20 minutes and rinse off with warm water.
  • Repeat the mask regularly to re-hydrate the face and reduce wrinkles.

Click here to know about Honey for Acne Treatment.

Tips and Precautions:

  1. For best results, rinse your face with mild soap and warm water and also steam your face before applying these masks to open up your skin pores.
  2. Honey might cause some allergic reaction on your skin. So, do skin patch test before using honey regularly to know whether it causing any reaction on the skin.
  3. Always use raw, organic honey rather than using normal honey to grab maximum benefits.
  4. Regular application of honey on the face will help you to get rid of many skin problems and glows your skin naturally.
  5. Intake of honey will help to strengthen your immune system and prevent the problem from inside out.

Best Honey Face Masks for Skin ProblemsTry these masks regularly. Do you know other honey face masks for any skin problem? Then share it with us.

Filed Under: Beauty, Remedies, Skin

Face Masks for Wrinkles using Eggs

October 31, 2016 By Sruthika Leave a Comment

Face Masks for Wrinkles using Eggs

Wrinkles – It is a natural process that makes the skin loses its natural elasticity and thereby reducing the collagen production which helps to restore the skin. It is mainly caused due to age, prolonged sun exposure, stress, unhealthy diet, smoking, genetics, etc.

Wrinkles make you look old and embarrassed. To get rid of sagging or loose skin, stop rushing for cosmetic anti-wrinkle skincare products and stay at home and try some natural home remedies for treating your wrinkles.

We all know that face is the major part that was affected and exposed to the public. So, the face mask is one best way to tighten your skin and delays the signs of aging. an Egg is the best remedy that strikes for almost all of us while thinking about skin tightening and shrinking the pores.

Eggs are effective in reducing the appearance of fine lines and restore the elasticity to the skin by enhancing the production of collagen. Here are the best egg face masks explained in detail. Have a look on it and try them to prevent your wrinkles.

Face Mask – 1: (Egg White)

Egg white has astringent property along with a rich content of proteins, nutrients like potassium, magnesium and riboflavin that repairs your tissues, prevents free radicals and thus slows down the aging process.

  • Separate egg whites from 2 – 3 eggs.
  • Whisk it and apply it on the face as a mask.
  • Let it sit for 15 – 20 minutes and rinse off with water.
  • Repeat it regularly to get rid of wrinkles and fine lines on the face.

Egg White Face Masks for Wrinkles

Note: Or mix egg white with any of these ingredients like honey, yogurt, oatmeal, lemon juice and honey, apple cider vinegar, strawberries juice, corn flour, glycerin and honey, cucumber, etc. and use it as an anti-wrinkle face mask.

Face Mask – 2: (Egg Yolk)

This mask is used to clear premature wrinkles and fine lines on the skin. Egg yolk is also effective in treating wrinkles. It is filled with proteins, vitamins and minerals that lock the moisture in the skin and hydrates the skin to prevent wrinkles.

  • Olive oil acts as a natural botox and banana with its rich vitamin E content prevents wrinkles.
  • Mash 1 ripe banana with a fork till it becomes a lump free paste.
  • Then add 1 teaspoon of extra virgin olive oil and 1 egg yolk in it.
  • Stir well and apply it on the clean face.
  • Leave for 15 minutes and rinse off with warm water.
  • Dry your face with a towel and continue doing this process regularly for once or twice a week.

Note: Or replace olive oil with coconut oil to prevent premature wrinkles.

Tips and Precautions:

  1. Avoid more talking or eating while you are in egg face masks, as this will reverse the condition and make your wrinkles worse.
  2. Do facial steaming before applying these face masks for proper absorption and to get faster results.
  3. Avoid smoking or consuming spicy and sugary foods as they cause premature aging.
  4. Apply sunscreen while stepping out at day time and use moisturizer to keep your skin well nourished.
  5. Follow some skin care hygiene like cleansing, exfoliating and moisturizing. Also, prefer to use organic skin care products rather than harsh cosmetics.
  6. Drink plenty of water and consume a healthy and well-balanced diet to delay your aging process.

Have you tried these egg face masks for tightening your skin pores? Do you know any other egg masks for wrinkles? Then share it with us.

Filed Under: Remedies, Skin, Wrinkles

DIY Body Wash using Coconut Oil and Honey

October 31, 2016 By Sruthika Leave a Comment

DIY Body Wash using Coconut Oil and Honey

Using chemical based harsh soaps will damage your skin, didn’t you feel that damage? Then it’s time to shift to use a body wash rather than soap bar.

Don’t worried about those costly body washes? Here we are going to know how to make an amazing coconut oil body wash at home with easy ingredients in simple steps.

Before starting, remember that regular usage of homemade body wash will help you in living more natural life, avoids chemicals or toxins damaging your skin, easy to prepare and use, cost affordable and can be used for everyone in the home.

Ingredients used in making Homemade Body Wash:

Coconut oil – It has rich content of coco-nutrients that moisturizes the skin without clogging the skin pores and makes you feel fresh.

Raw honey – Honey is a well-known skin soother that moisturizes your skin, heals your marks or scars on the skin, restores the elasticity and prevents germs with its antibacterial properties. But always prefer raw and unfiltered honey.

Liquid castile soap – Pure liquid castle soap will make your body wash with enough suds (without adding any chemical based foaming agents. Always prefer using an unscented castile soap (or vegetable soap) for this body wash. It is gentle and non – toxic.

Essential oils – Essential oils helps to clear the skin with its antimicrobial and antiseptic properties. It soothes, heals, deodorize, disinfect and repair the skin.

Vitamin E oil – Vitamin E is essential for skin moisturizing and repairing. It fights against the free radicals damaging the cells with its antioxidant property. It is a most common ingredient used in many skin care products.

Coconut Oil with Honey Body Wash:

  • Melt 1/4 cup of virgin coconut oil by heating it indirectly.
  • Then add 1 teaspoon of vitamin E, 1/4 cup of raw honey, 10 – 15 drops of your favorite essential (or combinations of it) oil in it.
  • Stir well and slowly add 1/2 cup of liquid castile soap and stir gently.
  • Transfer this mix to a glass or plastic bottle for regular usage.
  • Shake well before each use and follow it regularly to get a soft and glowing skin.

Coconut Oil with Honey Body Wash

Note:

  • Or mix 2/3 cup of liquid castile soap, 1/4 cup of raw honey, 2 teaspoons of carrier oil (olive oil or sweet almond or jojoba or grapeseed oil), 1 teaspoon of vitamin E oil and 50 – 60 drops of essential oils. Pour it in a bottle and use it regularly.
  • Or use rosewater instead of honey and vitamin E oil while preparing your body wash.
  • Alternatively, mix 1/2 cup of coconut milk, 2/3 cup of castile soap, 3 teaspoons of vitamin E oil, 5 drops of lavender oil and 2 teaspoons of vegetable glycerin. Shake it well and use it regularly within a short span of time.

Tips and Precautions:

  1. This body wash will last longer for few months, as all the ingredients used in this wash have longer shelf life.
  2. Remember that this homemade body washes will not lather like commercial body washes. But they are effective in cleaning your skin and keeping it well hydrated.
  3. To get a thicker consistency, use a bit of sea salt or vegetable glycerin to your homemade body wash.

Try experimenting with different combinations of oils with liquid castile soap and enjoy homemade body wash. Also, feel free to share your experience about homemade coconut oil body wash with us.


Filed Under: Beauty, Remedies, Skin

DIY Homemade Coffee Oil

October 27, 2016 By Sruthika Leave a Comment

DIY Extract Coffee Oil From a Coffee Bean

Coffee – almost everyone loves coffee or coffee products. It is not a simple beverage that attracts with its aroma and taste but also exhibits certain effective properties like an antioxidant agent, increases blood circulation to prevent cellulite, aids in proper hair growth, etc.

In general, coffee beans have some natural oils which will be activated with heat application that often termed as essence or caffeol. This coffee oil is included in many things like cosmetics, fragrances, biodiesel and health supplements.

Benefits of using Coffee Oil:

Here are some of the benefits mentioned of using coffee oil on the skin, hair and health.

  • It acts as an antioxidant that prevents the attack of free radicals on the skin.
  • It uplifts your mood by reducing stress, anxiety, and depression by smelling the oil.
  • It increases blood circulation in the body to promote hair growth by reducing the hair shedding.
  • It tightens the skin to reduce the appearance of cellulite and also prevents wrinkles and dark circles.
  • It acts as a respiratory aid that can be used to clear blocked nasal passage. Also, it is used as an aromatherapy.
  • It is used as a light moisturizing oil that gives shine to both skin and hair.

Do you know that this effective coffee oil can be prepared at home with simple ingredients?

Yes, we can prepare coffee oil in two methods viz., cold infusion method and heat infusion method. Have a look on how to prepare this oil at home and use it.

Method – 1: (Cold Infused Method)

This method is a time-consuming process and all you need is ground coffee and any carrier oil.

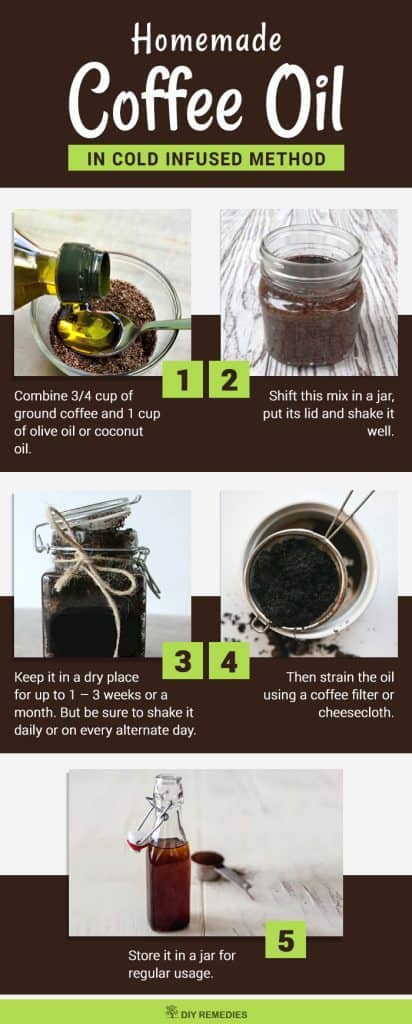
DIY Homemade Coffee Oil Cold Infused Method

  • Combine 3/4 cup of ground coffee and 1 cup of olive oil or coconut oil in a jar.
  • Put its lid and shake it well.
  • Keep it in a dry place for up to 1 – 3 weeks or a month.
  • But be sure to shake it daily or on every alternate day.
  • Then strain the oil using a coffee filter or cheesecloth.
  • Store it in a jar for regular usage.

Method – 2: (Hot Infused Method)

This method is preferred by most of us, why because it can be prepared easily in a short span of time. Here, we use coffee beans instead of ground coffee.

  • Pour 4 tablespoons of ground coffee beans and 8 tablespoons of pure olive oil in a small crock pot.
  • Cook on a medium to high heat for few minutes to few hours.
  • Stir occasionally and turn off the heat.
  • Strain the oil using cheesecloth and store it in a glass jar.

Avoid taking this coffee essential oil internally. Pregnant women and children should not use this oil without consulting their doctor. Also, conduct a skin patch test before using it.

Prepare this coffee infused oil and use it regularly to grab many skin and hair benefits. Do you have any queries on this coffee infused oil? Then share it in the comments box.

Filed Under: Remedies, Skin

DIY Garlic Remedies for Skin Tags

October 19, 2016 By Gnanika Leave a Comment

Skin tags or papilloma are abnormal and non – cancerous growths on the skin’s surface. They appear most commonly on the eyelids, neck, chest, armpits, under the breasts, inner thighs and in skin folds. However, they are not harmful, painful or contagious but most people consider these as ugly spots on the skin.

These tiny bumps are composed of blood vessels and collagen fibers surrounding them. While friction (either skin – skin or cloth – skin) is considered as one of the main reason for skin tags, they also caused due to weak immune system, genetics, age, overweight, diabetes, hormonal changes and human papillomavirus (HPV).

There are many surgical methods like freezing, cryosurgery, biopsy, ligation and excision suggested by a dermatologist for eliminating skin tags. These surgical methods are painful with a lot of cost and side effects.

But do you know these tags can be removed with some natural home remedies? Yes, Garlic is one such effective natural home remedy used to remove skin tags on your skin.

Have a look at the properties and methods of using garlic for skin tags removal.

How Does Garlic Removes Skin Tags?

  • Garlic has antibacterial, antiviral and antiseptic properties that fight against HPV causing skin tags.
  • It contains a sulfur compound called allicin which helps to dry out the tag and makes it fall naturally.
  • It acts as an antioxidant that protects your body against oxidative damages from free radicals, which in turn results in prevention of skin tags.
  • It strengthens your immune system to get rid of skin tags now and then. Also, we know that garlic is an effective weight loss remedy that aids in clearing the skin tags, caused due to overweight.
  • It has an anti-inflammatory property that removes the tag without any pain or irritation.
  • It has all essential enzymes, minerals (selenium) and nutrients that prevents skin tags and thus give a boost to your collagen to make your skin structure normal.

How to use Garlic for Skin Tags:

These are the best garlic methods used to remove skin tags safely. Let’s get started.

Method – 1: (Garlic Cloves)

  • Wash the skin tags affected area and dry it with a soft towel.
  • Apply a thin layer of Vaseline around the skin tags areas.
  • Then place the crushed garlic cloves on the skin tags.
  • Secure it with a bandage and leave it on for overnight.
  • In the next morning, remove the band-aid and garlic clove.
  • Repeat the same process regularly till you get rid of skin tags.

How Does Garlic Removes Skin Tags

Note: Alternatively, apply garlic juice with a cotton ball (or) garlic paste instead of crushed cloves on the skin tags.

Method – 2: (Garlic Cloves with Duct Tape)

  • Duct tape suffocates the tag without the proper supply of oxygen and blood, which in turn shrinks the tag, make it black and fall off.
  • Cut a garlic clove into thin slices and place it on the skin tag.
  • Make sure that these slices should cover all the skin tag affected area.
  • Then wrap it with duct tape to secure the garlic slices.
  • Leave it for few hours and remove it to rinse with lukewarm water.
  • Dry your skin and continue doing it regularly till the skin tags fall off on its own.

Garlic-Ducttype

Method – 3: (Garlic with Cauliflower)

  • Both garlic and cauliflower dry out the skin to remove skin tags. Cauliflower has essential nutrients that strengthen your immune system and prevents skin tags.
  • Peel and cut 1 potato and cauliflower into pieces.
  • Blend these potato pieces, cauliflower and 3 garlic cloves into paste form.
  • Apply this paste on the skin tags at night before bedtime and secure it with a bandage.
  • Remove it in the next morning and wash it off.
  • Dry your skin and do the same regularly for 2 – 3 days.

Method – 4: (Garlic Oil)

  • Natural oils like organic coconut oil, extra virgin olive oil, canola oil, etc. can be used to prepare garlic oil. These natural oils will also help in treating the skin tags without any irritation caused by garlic on the tags surrounding areas.
  • Pull out the cloves from the garlic into several pieces.
  • Peel the skin of the garlic cloves and smash it slightly.
  • Then place these garlic cloves on a pan filled with 1 cup of natural oil.
  • Heat the oil and garlic on a low flame for 20 – 30 minutes and turn off the heat.
  • Remove the garlic cloves from oil and let the oil cool for few minutes.
  • Then dip a cotton ball in this garlic oil and dab it on the skin tags.
  • Cover it with a bandage and leave it on for few hours to overnight.
  • Remove it and rinse with lukewarm water.
  • Dry your skin and repeat the same to remove skin tags naturally.

Note: Or you can purchase garlic oil directly and apply it on the skin tags.

How Long Does Garlic take to remove Skin Tags?

It mainly depends on the immunity and the size of skin tags, as garlic has to work on both of these factors, which are very essential for removing skin tags now and in future. But be patience and use garlic continuously for 3 days, give a break of a day or two and repeat its application.

Tips and Precautions:

  1. Garlic might cause some irritation to the skin surrounding the skin tags. So, apply a thin layer of Vaseline or any other natural oils or moisturizers around the skin tags affected areas before using garlic for skin tags.
  2. If you have dry or sensitive skin then apply more of Vaseline or avoid using garlic for skin tags, as it causes skin irritation and makes the skin more dried. Try other natural remedies like tea tree oil, oregano oil, apple cider vinegar, etc.
  3. Avoid using garlic for skin tags on eyelids or eye area, as it stings a lot and causes irritation. It is also advisable to avoid garlic on skin tag which is cut or having infection.
  4. Maintain a healthy weight to prevent many health and beauty problems, including skin tags.
  5. Consume a nutritional food, drink plenty of water, do some regular exercises and maintain proper skin care to get relief from skin tags.
  6. When once the skin tag fall off then remember to apply some antibiotic or natural remedies to prevent its recurrence.
  7. Never ever cut or pull off or scratch or rub or shave the skin tags, as it worsens your problem that leads to bleeding and skin infections.
  8. Garlic might cause some allergic reaction, so it’s advisable to do some skin patch test before applying garlic on skin tags.
  9. You can include garlic in your daily diet but be sure to check whether it is interacting with your regular medicines and thinning your blood. So, consult your doctor before taking garlic.

Hope you liked the article and give a trial to these garlic remedies. Feel free to share your queries or experience about skin tags in the below comment section.

Filed Under: Remedies, Skin Tags

10 Best Face Masks for Glowing Skin

October 17, 2016 By Sruthika Leave a Comment

10 Best Face Masks for Glowing Skin

Who doesn’t want a soft and glowing skin without spending much amount on beauty products or parlors? So, here we are presenting you the best homemade face masks with the simple ingredients that available in your kitchen cupboard.

Scroll down to know all about these homemade face masks for glowing skin. One time usage of these masks will give instant glow at that time but regular usage will definitely give you a constant glow in your face. Let’s get started.

Mask – 1: (Olive Oil with Baking Soda and Honey)

This face mask is suitable for all skin types. Olive oil penetrates deep into the skin, moisturizes properly, promotes elasticity and reduces blemishes to get a soft and smooth skin.

Honey tightens the skin pores, hydrates the skin to lock the moisture, fights against the microbes causing your skin problems and protects it from sun damage to prevent premature wrinkles.

Baking soda acts as an excellent exfoliant that removes excess oil, dirt and dead cells from the skin pores. It also reduces redness and boosts proper blood circulation to make skin glow naturally.

Steps to be followed…

  • Add 1 teaspoon each of extra virgin olive oil and baking soda and 1/2 teaspoon of honey in a bowl.
  • Stir well to make a fine paste.
  • Cleanse your face and pat dry by leaving it slightly damp.
  • Then apply this paste on the face and neck as a mask in a circular motion.
  • Let it sit for 10 – 15 minutes and rinse off with lukewarm water by scrubbing gently.
  • Pat your skin dry and repeat it once a week to maintain a soft and glowing complexion.

DIY Face Masks for Glowing Skin

Note:

  • Or simply mix 1 tablespoon each of baking soda and honey. Apply this mask on the clean face for 10 – 15 minutes. Scrub your face gently for few minutes with your wet fingers. Do it twice daily for best results.
  • Alternatively, applying an exfoliating mask will give relief from a dry and dehydrated skin, as it restores the moisture to remove dryness. Mix 1/4 cup of baking soda and 2 teaspoons of cinnamon powder in 1/2 cup of raw honey. Stir and apply it on the clean skin. Rinse off after 15 – 20 minutes.

Mask – 2: (Avocado and Honey Mask)

Avocado is a great source of healthy fats and antioxidants which make it a super food for your skin. It moisturizes the skin and reduces the attack of free radicals on the skin cells.

Oatmeal acts as an exfoliator to remove dirt and dead skin cells in the skin pores. Apple cider vinegar balances your skin’s pH level and prevents the attack of microbes. Lemon juice brightens your complexion with its astringent property and honey soothes the skin.

Steps to be followed…

  • Mash 1/2 an avocado in a bowl and add 1/4 cup of uncooked oatmeal, 2 tablespoons of raw honey, 1 tablespoon of organic apple cider vinegar and 1 teaspoon of fresh lemon juice in it.
  • Stir well all these ingredients and spread this paste on the clean face as a mask.
  • Leave it on for few minutes till the mask dries and rinse off with water.
  • Continue this mask for once or twice a week regularly to get a soft and supple skin.

Note:

  • Alternatively, mix 1 teaspoon of yogurt and few lemon drops in 1 mashed ripe avocado. Stir well and apply it all over the face and rinse off after 20 minutes with cold water.
  • Or simply mix 2 teaspoons of raw honey in 1/2 teaspoon of lemon juice. Apply it on the face and dry it for 20 – 30 minutes. Rinse off with lukewarm water and dry your skin.

Avocado and Honey Mask for Glowing Skin

Mask – 3: (Banana and Honey Mask)

This face mask works wonder for the people those who have oily and acne prone skin without forming scars on the skin. Banana has antioxidants and potassium along with other nutrients that combat acne and remove excess oiliness from the skin pores.

Honey moistures the skin and when mixed with cinnamon helps to reduce dark spots and scars.

Steps to be followed…

  • Mash 1/2 a ripe banana in a bowl and add 2 tablespoons of raw honey and 1/2 teaspoon of cinnamon powder in it.
  • Stir well and spread it on the freshly cleansed face and neck.
  • Let it sit for 10 – 15 minutes and wash with lukewarm water followed with cold water.
  • Repeat regularly for best and quick results of fair skin.

Note:

  • Or else mix 3 teaspoons of raw honey in 1/2 teaspoon of cinnamon powder to make a paste. Apply it on the face and rinse off after 20 – 30 minutes.
  • Or simply rinse your face with lukewarm water and apply honey on your face. Rinse off after 20 minutes with lukewarm water followed with cold water.

Mask – 4: (Strawberry with Yogurt Mask)

This mask works wonders on your dry and dull skin by providing essential hydration. Strawberries are packed with vitamin C, salicylic acid and acts as a gentle exfoliant for dry skin when mixed with oats. Yogurt soothes the skin by providing essential moisture and makes it smooth and shiny.

Steps to be followed…

  • Blend 1/4 cup of dry rolled oats into powder form and take it out into a bowl.
  • Then add 3 mashed strawberries, 3 tablespoons of plain yogurt and 2 tablespoons of honey in that bowl.
  • Stir well and apply on the clean face and neck thoroughly.
  • Wait till the mask dries and wash it with warm water.
  • Dry your skin and apply your favorite toner and serum for instant glowing skin.

Note:

  • Or simply, add 2 tablespoons of raw honey, 1 tablespoon of olive oil in a mashed ripe strawberry to make a paste. Apply it on the clean face and rinse off when once it dries.
  • Or add 1 tablespoon of organic honey in 7 – 8 freshly mashed strawberries. Apply this pack on the face and rinse off after 20 – 30 minutes.

Mask – 5: (Grapefruit with Egg White Mask)

Grapefruit, a citrus fruit has natural bleaching property that lightens the skin and works with the collagen to prevent skin’s elasticity. Egg white has proteins that fade away the hyper-pigmentation and acne scars on the skin.

Oatmeal exfoliates the skin and honey moistures the skin to give clear and fair complexion.

Steps to be followed…

  • Whip an egg white (from 1 egg) in a bowl.
  • Mix juice of 1/2 a grapefruit, 1 tablespoon of raw honey and 1/2 cup of oatmeal.
  • Then stir all these ingredients and spread it as a mask on the clean face and neck.
  • Allow it to sit for 15 – 20 minutes and rinse off with water.
  • Dry your skin and repeat the process regularly to maintain this smooth and glowing skin.

Note:

  • Or beat 1 egg white till it is fluffy and add 1 teaspoon each of freshly squeezed lemon juice and grapefruit juice and 2 teaspoons of sour cream in it. Stir well and spread it on the clean face. Rinse off after 15 – 20 minutes and dry your skin to apply moisturizer.
  • Or whip an egg white and add 1 teaspoon of honey and 1/2 teaspoon of fresh lemon juice in it. Stir well and apply it on the face. Wash it after 10 – 15 minutes.

Mask – 6: (Oatmeal and Honey with Chamomile Tea)

Heat from chamomile tea helps to open up the skin pores and removes dirt and bacteria. Honey moisturizes your skin to make it soft and supple. Oatmeal exfoliates and removes excess oil from the skin pores. Almond oil has rich content of vitamin E that provides many skin care benefits.

Steps to be followed…

  • Mix 2 tablespoons of organic honey, 2 – 4 drops of almond oil and 1/4 cup of oatmeal in 1 cup of freshly brewed chamomile tea.
  • Stir well and spread this mix on your damp skin.
  • Leave it on for 7 – 10 minutes and rinse off with cold water to feel refreshed.

Mask – 7: (Aloe Vera and Honey)

Aloe vera acts as a natural astringent that removes dead cells, excess oil, tighten up your skin pores and provides a healthy glowing skin. Both honey and aloe vera have soothing and moisturizing properties that repair your damaged skin to get refreshed.

Steps to be followed…

  • Mix 2 teaspoons of organic honey with 1 teaspoon of freshly squeezed aloe vera gel.
  • Stir well and apply it on the face thoroughly.
  • Wait till the mask dries and wash your face with water.
  • Dry your skin and repeat it regularly to sooth the rashes and irritation on the skin and to make your skin soft and glowing.

Note: Or simply mix 1 tablespoon of aloe vera gel, 2 tablespoons of milk cream and a pinch of turmeric. Stir well and apply evenly on the clean face and neck. Rinse with lukewarm water after 20 – 30 minutes.

Method – 8: (Turmeric and Sandalwood Mask)

Turmeric is an effective ayurvedic medicine used as antibiotic, skin whitener, antioxidant and anti-inflammatory which helps to treat many skin problems. Sandalwood soothes the skin and removes scars.

This mask will give instant glow with long lasting results. So, follow it regularly.

Steps to be followed…

  • Mix 1 tablespoon each of sandalwood powder and turmeric powder in 3 tablespoons of rose water.
  • Stir well and spread this paste on the clean face and neck.
  • But be sure that this mask should not get into your eyes. If happened, unfortunately then rinse off immediately with water.
  • Wait for 20 minutes till the mask dries and rinse off with water.
  • Do the same process regularly to get complete relief from the problem.

Note:

  • Or add 1 teaspoon each of raw milk and honey in 1/4 teaspoon of turmeric powder. Stir well and apply it on the clean face. Dry for 10 minutes and rinse off with cool water and a mild facial cleanser.
  • Or else add fuller’s earth to this turmeric and sandalwood paste before applying.
  • Also, mix 2 tablespoons of gram flour and 1/2 tablespoon of turmeric in enough yogurt. Apply on the face and neck and wash with lukewarm water after 20 – 25 minutes.

Mask – 9: (Papaya and Honey)

Papaya has rich beta – carotene, powerful papain enzyme and other phytochemicals that slow down the wrinkles, combat free radicals attack, reduces the blemishes and scars and thus lightens up your skin.

It is also rich in vitamins A & C, AHA and potassium that deeply cleanses your skin pores to prevent skin problems.

Steps to be followed…

  • Cut 1/2 part of papaya and peel it off properly.
  • Remove the seeds and cut it into small pieces.
  • Blend these pieces by adding 1 tablespoon of raw honey in it.
  • Apply this mix on your clean face and neck as a mask.
  • Rinse off with water after 30 – 45 minutes.
  • Repeat it regularly to get a fair glowing skin.

Note:

  • Or add 1/2 teaspoon of fresh lemon juice, 1 tablespoon of honey in 1/4 piece of a papaya. Blend it and apply it on the face. Wait for 15 minutes and rinse with lukewarm water and cold water.
  • Also, peel and blend these ingredients like 1/4 piece of ripe papaya, 1/2 a banana and 1/4 cucumber to make a paste. Apply it on the face and rinse after 15 minutes with warm water followed by cold water.

Mask – 10: (Orange Peel and Honey)

Orange peel has antioxidant, astringent and vitamin C content which make it as a natural skin whitener. But be sure that it causes some drying and stinging sensation on dry or sensitive skin people.

Steps to be followed…

  • Grate fresh peel of an orange and mix with 1 tablespoon of honey.
  • Then add 1/2 tablespoon of turmeric powder in it.
  • Stir well and apply it on your clean face and neck.
  • Leave for 30 minutes and rinse off with cold water.
  • Also, add your favorite clay pack in this face mask for added advantages.
  • Dry your skin and apply some moisturizer to prevent dryness.
  • Regular follow-up of this mask will help to brighten and lighten the skin.

Tips and Precautions:

  1. Even tomato helps for skin whitening with its antioxidant and astringent properties along with a rich content of vitamins (A, B & C), potassium and magnesium. Mix 2 teaspoons of tomato juice in 3 teaspoons of buttermilk. Apply on face and neck. Rinse off after 30 minutes.
  2. For best results, rinse your face to remove make-up or any dirt on the skin before applying any face mask.
  3. Also, steam your face before applying the face mask for deep penetration of mask into skin pores.
  4. Rinsing your face with lukewarm water followed with cold water will help to close the pores and lightens your facial skin.
  5. Always it’s recommended to rinse your face and neck before going to bed (or take shower) to prevent the damage caused on the skin pores.

Try these face masks regularly and let me know which mask worked well in lightening your face. Or do you know any other face masks for glowing skin? Then share it with us.

Filed Under: Beauty, Remedies, Skin

« Previous Page
Next Page »

Footer

DIY Remedies is a participant in the Amazon Services LLC Associates Program, an affiliate advertising program designed to provide a means for sites to earn advertising fees by advertising and linking to amazon.com.

  • Home
  • Affiliate Disclosure
  • Disclaimer
  • Terms and Conditions
  • Privacy Policy
  • About Me
  • Contact Us
Copyright © 2020 · DIYRemedies.org