• Skip to primary navigation
  • Skip to main content
  • Skip to footer

DIY REMEDIES

Radiant Wellness: Empowering Your Health and Beauty

  • Home
  • Recent Articles
  • Remedies A – Z
  • DIY Smoothies
  • Reviews
  • About Me
  • Contact Us

Beauty

DIY Remedies for Cystic Acne

September 1, 2016 By Gnanika Leave a Comment

DIY Home Remedies for Cystic Acne

The skin pores are generally composed of hair follicles and sebaceous glands (this oil gland work as a protective layer on the skin). If the oil is over produced and clogs the skin pores along with the epidermal cells shed by skin and this will give rise to acne. If this acne gets infected deeply to form cysts then it becomes cystic acne / pimples.

It is caused due to hormonal changes, greasy cosmetics, excessive sweating, certain drugs, aging, poor skin care hygiene, etc. and it is most commonly seen in teenagers. These cysts are filled with fluids that contain dead cells, bacteria and white blood cells which appear mostly on face, chest and back.

There are many over the counter treatments available in the market but the usage of natural remedies will give best, safe, cost effective and long lasting results to the cystic acne. So, try the below mentioned natural home remedies for cystic acne.
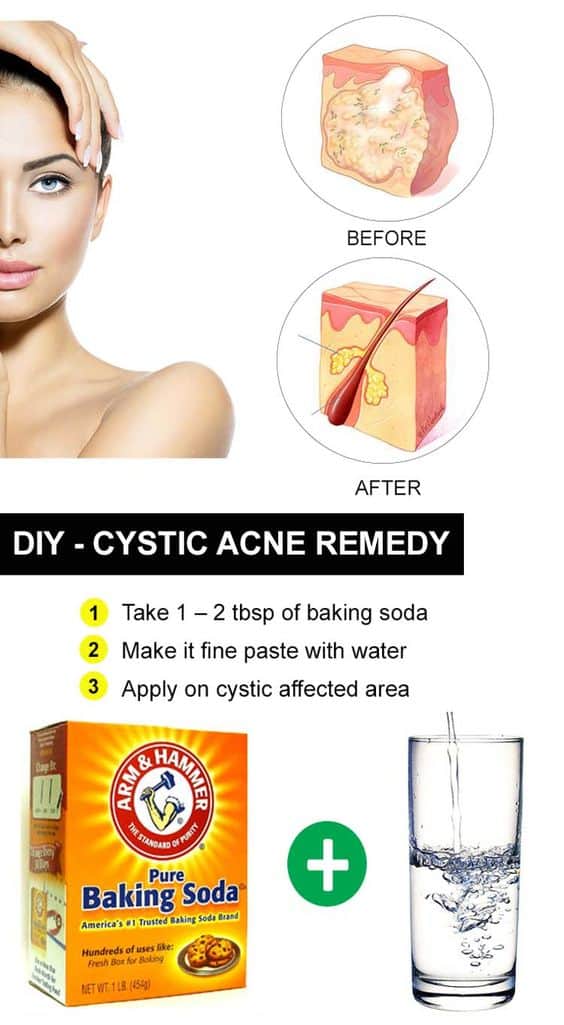
1. Baking Soda

Baking soda has antibacterial, antiseptic and antimicrobial properties that prevent bacteria causing acne. It has anti – inflammatory property that heals the pain or inflammation on the skin. It also balances the pH levels of the skin to make it healthy by exfoliating the skin to absorb excess oil.

Steps to be followed…

  • Add 1 – 2 tablespoons of baking soda and enough of water in a bowl.
  • Stir well to make it a thin paste and apply it on the cystic acne affected areas.
  • Let it sit for about 15 – 20 minutes and rinse off with lukewarm water.
  • Dry the area gently and apply moisturizer that suits your skin type to prevent dryness and irritation.
  • Continue doing this process for 1 – 2 times daily to get rid of acne cysts.

Note:

  • Or use enough cucumber juice instead of water for mixing baking soda and apply it on cysts.
  • Mix baking soda and sea salt in a little of water and apply this on acne cysts. Wait for 3 – 5 minutes and rinse off with water.

2. Apple Cider Vinegar

Apple cider vinegar (ACV) has astringent property that removes the excess oil to cure acne and also reduces pain and inflammation due to its anti-inflammatory property. It balances the pH levels and cleanses the skin thoroughly to get rid of dead cells, excess oil and bacteria.

Steps to be followed…

  • Dilute 1 tablespoon of organic apple cider vinegar in 1 teaspoon of water.
  • Stir well and dip a cotton ball in it and dab it on the affected skin areas.
  • Rinse off with water after 15 minutes and dry the skin gently.
  • Repeat the process for twice daily for few days to get relief from acne cysts.

Note:

  • Or else apply ACV directly on the cystic acne and leave it on for overnight and rinse off in the morning.
  • Or simply, mix 1 teaspoon of raw ACV and a little of honey in 1 glass of warm water. Drink this tonic for once or twice daily to prevent acne and other skin problems from inside out.

3. Egg White:

Egg white has great source of proteins and also has enzyme called lysozyme that destroys bacteria and tightens the skin to narrow down and close the skin pores for deep cleansing. The drying effect of egg white will remove the excess oil from the skin.

Steps to be followed…

  • Separate egg white from an egg and place it in a bowl.
  • Add 1 teaspoon milk and 1/2 teaspoon honey in it.
  • Stir well and apply this mix on the clean face as a mask by covering all over the face and neck.
  • Leave it on for about 30 – 45 minutes to get dried completely.
  • Now wet your fingers with warm water and gently scrub it on the face.
  • Finally, rinse off with water and dry the skin.
  • Do the same process for twice a week on regular basis.

Note: Or if you have a dry skin then rinse off after 15 minutes of application, rather than till it gets dried completely on the skin to prevent over dryness and irritation.

4. Tea Tree Oil

Tea tree oil has excellent antibacterial and antiseptic properties that fight against acne causing bacteria. It penetrates deep into the skin to unclog the hair follicles, disinfect the pores and dry out blemishes by removing dust and other impurities.

Steps to be followed…

  • Add tea tree oil and water in 1:3 ratio and stir well.
  • Apply it on the cystic acne affected areas by using a cotton ball.
  • Let it sit for few minutes and rinse off with water.
  • Regularly use it for 2 – 4 times a day to get rid of cystic acne without any scars.

Note:

  • Or simply apply tea tree oil directly on the acne cysts using cotton swab at night before bed time. Rinse off with lukewarm water in the next morning.
  • Alternatively, use tea tree oil based moisturizers, creams, gels or facial masks regularly to get rid of the problem.

5. Neem or Indian Lilac:

Neem is an age old remedy that was widely used by Ayurveda for treating many skin problems, including acne. It helps to detoxify the whole system and purifies blood which in turn reduces the pus and inflammation caused due to acne. It also helps to break out the cysts and reduces the spread of infection.

Steps to be followed…

  • Boil some neem leaves in water for about 5 – 7 minutes.
  • Allow it to cool down for another few minutes and strain the water.
  • Drink this water to get relief from cystic pimples from inside out.
  • Regular intake will help you to get rid of this bacterial infection completely from the skin.

Note:

  • Or simply chew fresh tender neem leaves in the morning to grab maximum health benefits.
  • Alternatively, crush few fresh neem leaves with little of water to make a fine paste. Apply this paste on the acne cysts affected areas. Wash off after few minutes.
  • Or else, apply neem oil to the cystic acne using a cotton ball and leave off for few hours to overnight. Repeat it for twice daily till you cleared the acne cysts on the skin.

6. Honey:

Honey has antibacterial and antioxidant properties that fight against the bacterial and free radicals attack on the skin and thus prevents the damage caused to the skin. It has anti-inflammatory property that soothes the redness, irritation and discomfort caused by acne cysts.

Step to be followed…

  • Dip a cotton ball in raw and organic honey and dab it on the cystic acne affected skin areas.
  • Leave it on for about 10 – 15 minutes and rinse off with warm water.
  • Dry the skin gently and repeat the same for 2 – 3 times daily for few days to notice the quick relief.

Note: Or mix 1 teaspoon of cinnamon powder in 1/2 teaspoon of organic honey till it forms fine paste. Apply it on the affected areas and rinse off with warm water after 10 minutes to get rid of the cystic acne.

7. Coconut Oil:

Don’t get confused that cystic acne is a result of excessive oil deposits in the skin and using coconut oil will even worse your condition. Coconut oil is one excellent remedy for treating acne cysts.

It contain healthy fats that in turn has rich source of medium chain fatty acids that exhibits antibacterial, antimicrobial and anti-inflammatory properties, which is used to get rid of acne cysts. It has vitamin E that exhibit antioxidant property to fight against the attack of free radicals on the skin.

Steps to be followed…

  • Start the process with facial steam to clean the face and also to open up the skin pores.
  • Then add few drops of organic coconut oil on the face and neck.
  • Be sure to concentrate more on the cystic pimples affected skin areas.
  • Massage it gently for few minutes in circular motion and rinse off with mild soap and water after few minutes – few hours.
  • Repeat the same process for 2 – 3 times daily (once at night before bedtime) to cure acne cysts without forming scars on the skin.

Note: Alternatively, use any natural oils (or) a combination of essential oil with natural oils to get relief from cystic acne along with its scars on the skin.

8. Clay Masks:

Clay has amazing absorbent, exfoliating and astringent properties that help to draw the excess sebum, eliminates dead cells, open up the skin pores and cleanse the affected areas. It also cools the redness and the irritated skin.

Steps to be followed…

  • Add 1 – 2 tablespoons of clay (fuller’s earth or bentonite clay or green clay) in enough of water.
  • Stir well by adding 1/2 teaspoon of raw honey and 1 – 2 drops of tea tree oil in it.
  • Stir and apply this all over the face and neck as a face pack.
  • Allow it to dry completely for about 15 – 20 minutes.
  • Then wet a clean washcloth and gently rub on the mask applied skin to remove mask.
  • Now rinse gently with cold water to close the skin pores.
  • Dry the skin to apply moisturizer and repeat the same daily for a week to get rid of the problem.

Note: Or else mix the clay as per your skin type like water (for oily skin), milk (for combination skin) and jojoba oil (for dry and sensitive skin).

Tips and Precautions:

  1. Drink plenty of water, avoid oily, fatty and spicy food, reduce the intake of sugar, dairy products and processed foods, consume healthy and balanced diet (like fresh fruits and veggies, vitamin A, C & E rich foods), etc.
  2. Reduce your stress levels by doing meditation, deep breathing, yoga and other related exercises.
  3. Sleep for at least 7 – 8 hours, take some proper care for your skin, wear loose clothes to avoid rubbing or excessive sweating, remove make-up before going to sleep, avoid over harmful or greasy cosmetic products, etc.
  4. Consult your dermatologist if you didn’t find any relief from the cystic acne after using these amazing home remedies, as it might be caused due to any other health related problems.
  5. Lemon or lime juice, facial steaming, turmeric powder, potatoes, mango, aspirin paste, aloe vera gel, green tea, sea salt water, lavender oil, ice it, etc. are some other effective cystic acne natural remedies used at home.
  6. Never ever pick or squeeze the acne which in turn results in spreading the infection and scarring. You can also moisturizer your skin by using an oil – free moisturizer.

That’s all for now about Natural Remedies for Cystic Acne, hope you’ll give a trial to these methods and cure your problems. Let me know which one works well for you in dealing with cystic acne.

Filed Under: Acne, Remedies

How Lemon is used for Face Problems

August 30, 2016 By Sruthika Leave a Comment

How-Lemon-is-used-for-Face-Problems

Lemons have become a part of our life by giving various health and beauty problems, particularly for your face. Face is your identification and represents all about yourself to others. So, a clean and bright face is very essential in this modern society. Lemon helps to clear blemishes, wrinkles, dark spots and whitens your skin tone with its amazing properties.

Here in this article, we are going to know how lemon is used for treating many skin problems. Have a look on how to use lemon for preventing the particular problem. Let’s get started.

Method – 1: (Lemon for Dark Spots)

Dark or brown spots are caused due to the increase in melanin content in the skin and thus turn into darker. It appears most commonly on face, neck, hands, legs, chest and shoulders which are more exposed to the sun.

Lemon has natural lightening property that helps to bleach the dark skin and makes you appear with even skin tone. It exfoliates to remove the dead cells and reveal the fresh layers of the skin.

  • Cut a large fresh lemon into slices and place it on the dark spots.
  • Rub it gently and rinse off with water after 10 – 15 minutes.
  • Repeat it regularly to get rid of the problem.

Lemon for Dark Spots

Note:

  • Or dilute lemon juice in water and apply it on the dark spots using a cotton ball.
  • Or else mix sugar to lemon juice and use this to scrub the affected areas of the skin. Rinse off after 15 – 20 minutes.
  • Alternatively, the combination of lemon and tomato is also very effective in treating many skin and face problems. Mix a paste of 2 tomatoes in 4 teaspoons of fresh lemon juice and apply it on dark spots and rinse off after 30 minutes.

Method – 2: (Lemon for Blemishes)

Blemishes are one of the nightmares for most of the people. it is an inflammatory skin problem that caused due to the build-up of excess oil, dead cells on the hair follicles that clogs the skin and the bacteria thrives as acne or pimples.

Lemon has antibacterial and antimicrobial properties that kill the bacteria causing problem. It exfoliates to remove the dead cells to clog the pores and reduces redness and inflammation on the skin.

  • When honey mixed with lemon juice, it exhibits many amazing properties that help a lot in treating many skin problems including blemishes.
  • Wash your face and steam it to open up the skin pores.
  • Mix 1 teaspoon of honey in a freshly squeezed lemon juice from a lemon.
  • Apply this mask on the face but concentrate more on the blemishes.
  • Rinse off with lukewarm water and then with cool water for 30 minutes.
  • Dry the towel and repeat it twice weekly to get rid of the problem.

Note: Mix 2 teaspoons of fresh lemon juice and 1 teaspoon of ground cinnamon. Spread it on affected areas using a cotton ball and rinse off with warm water after 30 – 45 minutes.

Method – 3: (Lemon for Face Wrinkles)

As we age, the inner layer of the skin will start to become thin and reduces its ability to repair and causes wrinkles. It is caused by sun exposure, poor diet, stress, smoking and hormonal imbalance.

Lemon has citric acid that helps to exfoliate the skin to remove dead cells and acts as an astringent that deeply cleanse the pores to keep the skin healthy.

  • Dilute some water in fresh lemon juice and apply it directly on the wrinkles affected skin areas.
  • Massage gently for few minutes and let it sit for about 10 – 15 minutes.
  • Rinse off with cool water and continue thrice daily.

Note: Or add equal quantities of fresh lemon juice and Amla powder to make a fine paste. Apply it on the wrinkles affected skin areas. Rinse off with water after 5 – 10 minutes and repeat it regularly.

Method – 4: (Lemon for Skin Whitening)

Everyone wishes to have flawless beautiful skin but due to more of melanin pigment the skin looks darker and lemon helps a lot in giving a flawless and fair skin with an even tone.

Lemon has astringent property that tightens the skin pores and thus reduces the sebum secretion. It has natural lightening and bleaching property that gives even skin tone with fair complexion.

  • Add 1 teaspoon each of fresh lemon juice and fuller’s earth and 2 teaspoons of rose water.
  • Stir well and apply it on the dark skin.
  • Rub it gently and let it sit for about 15 – 30 minutes.
  • Wash the applied area with water and repeat the process regularly.

Note:

  • Mix 1 teaspoon each of fresh lemon juice, honey and olive oil. Apply it on the dark skin and massage for 5 minutes. Rinse off with lukewarm water after 10 – 15 minutes.
  • Alternatively, mix 1 teaspoons of lemon juice and turmeric powder and apply it on the dark skin. Rinse off with cold water after 15 – 20 minutes.

Tips and Precautions:

  1. Avoid going on sunlight during application or after application of lemon juice, as it causes photo sensitivity and darkens the skin even more.
  2. Lemon causes dryness on the skin. So it’s best to apply moisturizer to the skin after its application.
    For sensitive or dry skin, direct application of lemon juice will cause some irritation, redness and itching on the skin.
    Avoid application of lemon juice around the eyes, on open wounds or cuts to prevent irritation.
  3. You can also use lemon essential oil on the skin to remove many skin problems and make your skin look with even skin tone.
  4. Consult your dermatologist if you didn’t get any relief from the skin problems after using lemon for face.

This is all about Lemon for Face, hope you liked the article and will give a trial to these lemon methods. Get your fair and flawless skin but don’t forget to share your experience with us.

Filed Under: Remedies, Skin

How Baking Soda used to Lighten Dark Underarms

August 29, 2016 By Sruthika Leave a Comment

How-Baking-Soda-used-to-Lighten-Dark-Underarms

Do you feel embarrassed to wear a sleeveless top and trashing all your tank tops because of dark armpits? Dark discoloration of the skin in underarms is not a medical problem and it is caused due to excessive sweating, improper ventilation, shaving, usage of chemical based deodorants, hormonal imbalance, accumulation of dead cells, sun exposure, etc.

However, there are many underarm lightening treatments available in the market but the chemicals present in these cosmetic products will do more harm rather than clear darkness in your underarms. So, the best solution is to rely on natural home remedies which are safe and works best in whitening your dark armpits.

Baking soda or sodium bicarbonate is one such a natural versatile ingredient that widely used to lighten up the dark underarms. Here are some of its amazing properties that make you to believe that it is an excellent remedy for dark underarms.

  • It exfoliates the skin to remove dead and damaged skin cells and promotes the production of new cells. It also bleaches the skin to lighten the area without harming the skin.
  • It acts as a drying agent that effectively absorbs the excess oil and unclogs the pores to prevent darkness in the armpits.
  • It has an excellent skin lightening properties that reduce the production of melamine and thus provides whiter skin tone.
  • It neutralizes the acid – alkaline nature of the skin with its proper pH balance and thereby prevents the skin getting darker.
  • It acts as a natural deodorant that helps to prevent the bad odor comes out from the underarms.

From the above-mentioned benefits, we came to know how this baking soda whitens the dark underarms but the main thing is that how to use baking soda for getting quick and effective results. For this, we are presenting you the best of baking soda methods. Let’s get started.

Method – 1: (Baking Soda with Water)

When baking soda (with coarse texture) mixed with water then it forms an exfoliating mix to remove dark and dead cells under the arms and also treats underarm rashes.

Steps to be followed…

  • Add enough of water in 1 – 2 tablespoons of baking soda.
  • Stir well to make a thick paste and apply this paste on the dark armpits.
  • Massage it gently in circular motions for few minutes and leave it on for another 10 – 15 minutes.
  • Rinse it off with lukewarm water and dry the armpits thoroughly.
  • Repeat the same process regularly for 4 – 5 times a week until you achieved the desired results.

Baking Soda Used To Lighten Dark Underarms

Note: Or use rosewater instead of normal water.

Method – 2: (Baking Soda with Lemon Juice)

Both baking soda and lemon have natural bleaching and skin whitening properties that dry out the skin to cleanse the underarms and whitens it up effectively.

Steps to be followed…

  • Add equal quantities of baking soda and fresh lemon juice in a bowl.
  • Stir well to make a fine paste and apply it on the armpits.
  • Massage it gently for 8 – 10 minutes and leave it to get dry.
  • Rinse the area with lukewarm water and repeat the same thoroughly for at least thrice a week.

Note:

  • Or mix 1/8 cup of hydrogen peroxide and a juice of half a lemon in 1/4 cup of baking soda. Stir well and apply it on the dark underarms. Massage gently and rinse off with water.
  • Alternatively, mix equal quantities of baking soda and lemon. Apply it on the armpits and rinse off with warm water and apply few drops of tea tree oil and massage gently in circular motions. Dry it before wearing your clothes.

Method – 3: (Baking Soda Detoxification to Armpits)

Detoxification of armpits will help to remove the dead skin cells, removes excess oil or moisture or build-up of deodorant stuff and impurities and makes it fresh all the day.

Steps to be followed…

  • Scrub your underarms gently with a loofah before taking your bath.
  • After the bath, apply baking soda on your wet underarms.
  • Scrub it gently for few minutes and rinse off thoroughly.
  • Repeat the same process regularly to get rid of dark underarms.

Method – 4: (DIY Baking Soda Deodorant)

This is a homemade natural deodorant that not only used to lighten the underarms but also prevents its odor from the body.

Steps to be followed…

  • Add 1/4 cup of baking soda, 3/4 cup of cornstarch in 4 tablespoons of melted coconut oil.
  • Stir well to make it a fine paste by adding more coconut oil (if needed).
  • Store this mix in an airtight container and leave it on for few minutes.
  • Apply a small amount of this mix as your deodorant on your underarms using fingers after taking bath.
  • Use this as your regular deodorant to whiten the dark armpits and also prevents its odor.

Note:

  • Or add some melted beeswax or Shea butter in this above mix before using as a deodorant.
  • For best results, add few drops of any essential oil in the above mix and use it regularly.
  • Or simply dust your clean and dry underarms with baking soda (as underarms powder) after taking bath will help to absorb the sweat and makes you feel fresh throughout the day.

Method – 5: (Baking Soda with Rosewater and Honey)

Baking soda exfoliates the skin, rose water acts as a natural skin deodorants and honey has antibacterial property that sticks to the dead cells and other impurities and clears them effectively from the skin. this process one best for treating dark armpits.

Steps to be followed…

  • Add 1 tablespoon each of baking soda and raw honey.
  • Stir well by adding few drops of rosewater till it forms a fine paste.
  • Apply this paste on the armpits and rinse it off with lukewarm water after 10 – 15 minutes.
  • Dry your armpits and continue doing the same regularly till you lighten the dark underarms.

Note: Or you can use certain natural ingredients with baking soda for underarm whitening such as milk, glycerin, cornstarch and vitamin E oil, mashed avocado paste, cucumber, coconut oil, apple cider vinegar, gram flour and curd, etc. to get rid of darkness on your underarms.

Tips and Precautions:

  1. For best and faster results, clean your armpits with mild soap and water to remove any traces of deodorant. Dry it before applying the baking soda evenly to both armpits.
  2. If you’re experiencing the feel of any burning sensation redness, rashes, etc. on armpits while using baking soda then stop using baking soda immediately and consult your doctor.
  3. If possible stop using deodorants and antiperspirants and instead use some natural deodorants like sandalwood essential oils, baking soda or any other homemade deodorants.
  4. Always it’s recommended to do some skin patch test before applying it on the skin to observe any negative results and stop using if you observe any negative or else enjoy using it.
  5. Rather than shaving, opt for waxing to remove the underarm hair from roots and to clear dead cells.
  6. It’s best to wear loose and cotton clothes which make the body to breathe freely without any continuous friction and improper ventilation, which causes dark color in underarms.
  7. Be patience and follow them regularly to see your desired results of underarms without any dark discoloration and bad or smelly odor.

Start wearing sleeveless tops and strapless gowns after using baking soda for dark underarms. Do you know any other baking soda methods for whitening armpits or having any queries? Then share it with us.

Filed Under: Remedies, Skin

How Aloe Vera Treats Psoriasis

August 25, 2016 By Sruthika Leave a Comment

How-Aloe-Vera-Treats-Psoriasis

Psoriasis is a chronic non-contagious skin problem that occurs when the dead cells begin to build up on the skin’s surface due to an autoimmune disorder (over production of new cells without discarding old cells on the skin) or genetics and appears as thick, dry, red and itchy patches on the skin.

These rashes are painful and cause irritation with slight itching. Although there is no complete cure for this problem but fortunately we can reduce its symptoms or intensity greatly either with over the counter creams and medication (OTC) or using natural home remedies.

The wise people will choose the natural remedies rather than OTC treatment, which cause harm to their body in long run. So, aloe vera (a succulent plant) is one of the best remedies for treating psoriasis at home. It is recommended by the International Congress of Dermatology in Prague, as an effective remedy than topical steroids for reducing the psoriasis symptoms.

Here we are providing you with all the information to know how does it work for reducing psoriasis and how to use it for faster relief along with some tips in this article. Let’s get started.

Does Aloe Vera work for Psoriasis?

Yes, it works well in reducing the symptoms of psoriasis like dryness, irritation, and itching with its amazing properties. It has been proved in many studies and research that aloe vera is more effective than topical steroids for treating psoriasis. Let’s have a look on it.

  • Aloe vera contains 99% of water which helps to hydrate the skin and locks the moisture to prevent dryness, itching, and irritation. It also forms a protective layer on the skin to prevent any microbial growth.
  • It penetrates deep into the skin that helps to reduce the thickness of rashes and prevents further breakouts on the skin.
  • The remaining 1% contains many essential nutrients such as vitamins (A, B, B12, C & E), minerals (copper, calcium, chromium, iron, magnesium, potassium & zinc), salicylic acid, amino acids, antioxidants, enzymes and polysaccharides which boost up the immune system to fight against the triggers causing psoriasis and keeps the skin healthy.
  • It has polysaccharides that strengthen the immune system by maintaining a proper count of white blood cells to fight against the harmful bacteria or virus getting into the body.
  • It contains mild anesthetic and anti-inflammatory properties that soothe the skin to get rid of pain, irritation, swelling and other inflammatory symptoms.
  • It has antibacterial, antifungal and antiseptic properties that help the immune system to function properly and clears psoriasis.
  • It aids in proper digestion and detoxifies the body to eliminate the toxins through colon and prevent gut problems when consumed orally and thus make psoriasis under control.
  • It acts as an antioxidant that reduces the effect of free radicals on the skin and relieves you from itching and irritation.
  • It has a natural substance called Adaptogen, which helps the body to adjust as per the external conditions to protect itself from getting illness and diseases. It boosts up the immune system if it is weak and calms down if it is hyperactive.

How to Reduce Psoriasis with Aloe Vera?

It’s always best to use aloe vera in fresh gel or juice form. Here are the best ways of using aloe vera for treating psoriasis.

Method – 1: (Aloe Vera)

This process is widely used to treat psoriasis on all over the skin along with nails and joints (psoriatic arthritis).

Steps to be followed…

  • Cut a leaf of aloe vera and slice it to open the leaf.
  • Squeeze it to extract its gel using a spoon.
  • Apply it on psoriasis affected areas and massage gently for 2 – 3 minutes.
  • Let it sit for at least 30 minutes to overnight and rinse off with cool water.
  • Repeat the same process for thrice daily till you got complete relief from the problem.

How to Reduce Psoriasis with Aloe Vera

Note:

  • Or blend aloe vera gel and water to get the fresh aloe vera juice. Apply this juice on the affected areas.
  • Alternatively, wrap the aloe vera applied psoriasis infected areas with a plastic sheet to lock the moisture on the skin.

Method – 2: (Aloe Vera Juice)

Vitamin B12 deficiency is one of the causes for psoriasis and aloe vera has this vitamin. So, Intake of aloe vera will help you to get rid of the psoriasis problem.

Steps to be followed…

  • Blend fresh aloe vera gel along with some water to obtain its juice.
  • Then drink at least 1/4 cup of this aloe vera juice.
  • Add a little of honey before drinking to enhance its taste.
  • Drinking 10 ml of fresh aloe juice for twice a day i.e. once before breakfast and once before dinner will help you to lessen the symptoms of psoriasis.

Aloe Vera Juice For Treats Psoriasis

Note:

  • Or mix aloe vera juice in smoothies, fruit or vegetable juices and drink it.
  • Be sure that not to take aloe vera if you’re pregnant or nursing women or suffering from kidney problems and also children for below 8 years without consulting a doctor.

Method – 3: (Aloe Vera with Coconut Oil)

Coconut oil has medium chain fatty acids that boost up the immune system and restores the moisture levels to get rid of psoriasis.

Steps to be followed…

  • Add 1/3 cup of fresh aloe vera gel in 1/2 cup of melted organic coconut oil.
  • Stir well and add 3 drops each of lavender, rose and peppermint oil to it.
  • Mix it and store it in an airtight container and keep it aside for few hours to overnight.
  • Apply this mix on psoriasis affected skin areas.
  • Leave it on for overnight and rinse off with lukewarm water in the morning.
  • Refrigerate the remaining aloe vera lotion for further usage.
  • Do the same process regularly to get relief from the psoriasis flare-ups and its symptoms.

Note: Or if you’re using it on the scalp then simply wash your hair and scalp with aloe vera shampoo and conditioner in the morning.

Method – 4: (Aloe Vera for Scalp Psoriasis)

Scalp psoriasis can be appeared as raised, reddish and scaly patches that affect the entire scalp and in certain cases, it can spread to the forehead, back of the neck and behind the ears. Aloe vera also helps you in dealing with scalp psoriasis without damaging your hair.

Steps to be followed…

  • Add equal quantities (1/2 glass) of aloe vera juice and water.
  • Stir well and apply this mix on the scalp and massage it gently for 5 – 8 minutes.
  • Let it sit for about 30 – 45 minutes and rinse off with lukewarm water.
  • Dry your hair thoroughly and repeat the same regularly.

Aloe Vera for Scalp Psoriasis

Note:

  • For quick results, add 2 drops of lavender or peppermint or tea tree essential oil in the aloe mix before applying.
  • Or else add some fresh organic aloe vera juice or gel to your regularly used shampoo and conditioners before using it on the hair.
  • Alternatively, mix 3 – 5 drops of any essential oil in 2 oz of aloe vera gel and apply it on the scalp. Rinse off with lukewarm water after 15 – 30 minutes. Repeat daily in severe case and twice a week for mild one.
  • Or simply mix some jojoba oil in aloe vera gel and apply it on the scalp. Massage it gently and leave for overnight. Rinse off with aloe vera based shampoos to get relief from itching, dryness and scaling patches on the scalp.

Tips and Precautions:

  1. If you don’t have aloe plant then use organic aloe vera gel or juice that was brought from health food stores or local pharmacies.
  2. Usage of aloe vera based creams, lotions, shampoos, soaps or conditioners but make sure to check that they contain at least 0.5% of organic aloe vera and use it regularly to get rid of the problem. Also, choose the best brands for regular usage.
  3. Use only gel or juice of aloe vera for treating any health problem but it won’t be effective of taking aloe vera capsules.
    Do some skin patch test before using aloe vera to know whether it causes any allergic reaction or not.
  4. Never ever use latex of aloe vera (for oral or topical application) why because it causes diarrhea, abdominal cramps, lowers blood sugar levels, etc. If taken in large amounts then also it causes the same problems.
  5. It might interact with certain medications so, it’s advisable to consult your doctor before using aloe vera for psoriasis treatment.
  6. For best results, apply aloe vera after taking your bath and leave it like that. Also, don’t delay to consult your doctor if you didn’t find any kind of relief after using aloe vera for psoriasis.
  7. Always follow a restricted psoriasis diet, healthy lifestyle, manage your stress, have dietary herbs and supplements, quit smoking and drinking alcohol and use the natural remedies regularly for holistic healing of psoriasis.

This is all about Aloe Vera for Psoriasis. Hope you’ll give a trial to these methods and get relieved from the symptoms of psoriasis. Let me know which method works well in treating your psoriasis.

Filed Under: Remedies, Skin

How to Get Rid of Eczema using Apple Cider Vinegar

August 24, 2016 By Sruthika Leave a Comment

How-to-Get-Rid-of-Eczema-using-Apple-Cider-Vinegar

Eczema is an acute or chronic non – contagious skin inflammation that results in itching, redness, burning, swelling, scaling and blistering rashes on different parts of the body like face, scalp, hands, neck, legs, upper chest, etc.

It is caused due to hypersensitivity reaction that triggered by any allergen, bacteria, emotional stress, hereditary, environmental irritants and excessive sweating. It is an embarrassing condition that can’t be cured completely but the symptoms can be reduced greatly.

It affects people of all ages but most common among infants. Usage of over the counter treatment or medications might harm your health but natural remedies will cure the problem without harming your skin or cost.

Apple cider vinegar stands best in treating eczema with its antifungal and anti-bacterial properties. It has many medicinal properties that even used by Hippocrates (father of medicine) for treating many health, skin and hair problems effectively.

Does Apple Cider Vinegar work for Eczema?

Yes, of course. It controls eczema with its amazing natural properties but you have to use only organic, raw and unfiltered apple cider vinegar that contains Mother (appear dark and cloudy at the bottom of bottle) for treating eczema.

  • It contains riboflavin, mineral salts, vitamins, enzymes, pectin, and minerals (like potassium, phosphorus, sulfur, iron, sodium, calcium) that boost up the immune system which in turn beneficial for curing eczema.
  • It has beta – carotene (an antioxidant) that helps to renewal the skin cells and makes it healthy skin with no dead cell inside the skin.
  • It has a rich amount of fiber content that improves the digestive system and makes it easy to flush out the toxins from the body, which helps to give relief from this skin disorder.
  • It works as an astringent that removes the bacteria, dust, oil and other impurities from the skin and keeps it healthy.
  • It has great source of potassium that helps you in dealing with allergenic conditions to get rid of eczema.
  • It effectively balances the pH levels of the skin to prevent itching, dryness, irritation and other discomforts caused due to eczema on the skin.
  • It has acetic, malic and lactic acids that exhibit antibacterial, antifungal and antiseptic properties which help to combat skin infections and dry skin causing eczema.
  • Detoxifying elements in vinegar helps to cleanse and detoxify the body and thus provides you with a clean and healthy skin.
  • It has an anti-inflammatory and soothing property that helps to soothe the irritated skin.

How to use Apple Cider Vinegar for Eczema:

From the above-mentioned properties, you came to know that ACV is an effective remedy for eczema but it is equally important to know how to use ACV properly. So, here we are providing you with the best ways of ACV to heal eczema.

Method – 1: (Apple Cider Vinegar)

This method is very easy and effective one that controls eczema on face, hands and scalp.

Steps to be followed…

  • Add equal quantities of apple cider vinegar and water in a bowl.
  • Stir well and apply it directly on eczema affected skin areas using a cotton ball.
  • Leave it like that to get dry completely.
  • Repeat the same process twice daily till you get relief from eczema.

Apple Cider Vinegar for Eczema

Note:

  • For sensitive skin people and for eczema on babies, dilute 1/4 cup of ACV in 3 cups of water and use it same as above.
  • Or simply pour the ACV – water mix in a spray bottle and spritz it on the affected skin areas.

Method – 2: (Apple Cider Vinegar Bath)

This process is used to treat eczema on hands, legs, back and places where you unable to apply ACV properly. It is great for people with sensitive skin or having a wide spread of eczema sores, as it removes dead skins and retains moisture to the skin.

Steps to be followed…

  • Run warm water in your bathtub and add 2 cups of apple cider vinegar in it.
  • Stir well and soak yourself in this water for about 25 – 35 minutes.
  • After that, dry your skin and apply moisturizer on the affected areas.
  • This process is used to treat eczema (especially Dyshidrotic eczema) on overall body and can be repeated daily for best results.

Get Rid of Eczema using Apple Cider Vinegar

Note: Or add 1/3 cup of safflower (or sunflower) oil to this bathwater for treating dry patches and moistures the skin.

Method – 3: (Apple Cider Vinegar Tonic)

Intake of ACV will work from inside of the body and clears eczema successfully. It provides all the essential nutrients (like potassium) needed to boost up the immune system and to fight against eczema.

Steps to be followed…

  • Add 1 – 2 tablespoons of ACV in 16 oz of tepid water.
  • Stir well by adding a little of blackstrap molasses, maple syrup or honey in it.
  • Mix properly and drink it for thrice daily at least 30 minutes prior to eating.
  • Continue doing this process regularly to get rid of eczema.

Note:

  • Alternatively, drink a cup of water mixed with 1 tablespoon of apple cider vinegar and a little of honey for twice daily before meals to get relief from inside the body.
  • Or simply add 1 teaspoon of ACV to your fresh fruit or vegetable juices and drink it to get the same benefits.

Method – 4: (Apple Cider Vinegar with Baking Soda)

Baking soda exfoliates the skin to remove dead cells on its surface and soothes the skin to reduce rashes and inflammation caused on the affected skin areas. This combination balances the pH levels and helps for faster relief.

Steps to be followed…

  • Add 1/4 teaspoon of baking soda and 2 tablespoons of organic ACV.
  • Mix well in 1/2 cup of water after the fizz has stopped and add a little of honey in it.
  • Stir and drink this oral solution for once daily to get relief from the skin eczema.
  • Do the same regularly for getting faster relief.

How to Get Rid of Eczema using Apple Cider Vinegar

Method – 5: (Apple Cider Vinegar for Scalp Eczema)

ACV disinfects and detoxifies the scalp by clearing the fungus or yeast causing problems. it also effectively removes the build up of the scalp that caused from styling products and harsh shampoos.

Steps to be followed…

  • Mix 1/4 cup of raw ACV to 1 cup of water and pour this mix in an empty spray bottle.
  • Shake it well and squirt it all over the scalp by concentrating more on eczema affected areas.
  • Massage it gently to saturate the mix and let it sit for about 5 – 7 minutes.
  • After that, rinse it off with warm water followed by mild shampoo.
  • Continue doing the same process regularly until you get relief from the scalp eczema.

Tips and Precautions:

  1. Always apply moisturizer after using ACV on the skin to prevent dryness and slight irritation, as ACV acts as a drying agent.
  2. Dilute more of ACV with water before using it to treat eczema in children and people with more dry or sensitive skin. Regular follow – up will help to prevent burning sensation on the skin.
  3. Avoid using any harsh soaps, dyes, shampoos, body sprays and detergents on the eczema affected skin, as it irritates the skin and thus results to eczema outbreaks.
  4. If you’re suffering from peptic ulcer, heartburn or chronic indigestion, then avoid taking apple cider vinegar for eczema.
  5. Always consult your doctor before taking ACV, especially if you’re pregnant or nursing women or children below 8 years or suffering from any chronic skin or health problems.
  6. ACV might interact with certain medications like diabetes (insulin levels). So, don’t take vinegar without a prior consult of your healthcare provider.
  7. Use a straw while drinking ACV to prevent any teeth or throat damage. Eczema will occur on the outermost layer of the skin (epidermis), so keep the areas clean that are exposed to the environment.
  8. Include fresh fruits and vegetables in your daily diet, reduce your stress levels, drink plenty of water, do some regular exercises, take proper care of your skin, avoid scratching, sweating, wear soft clothes, etc. will help to get control over eczema.

That’s all for about Apple Cider Vinegar for Eczema, hope this information will help you in getting control over eczema. Try it and share your experience with us through the comment section.

Filed Under: Remedies, Skin

How to Cure Lipoma using Apple Cider Vinegar

August 24, 2016 By Sruthika Leave a Comment

How-to-Cure-Lipoma-using-Apple-Cider-Vinegar

Lipoma is a fat lump or nodule that made of adipose (fatty) tissues which are located beneath the skin. Actually, it appears like a big pimple that can reach to several centimeters. It is a benign tumor (non – cancerous) which is harmless, painless, non – itchy or not as red on the skin and it is soft to touch and can be moved under the skin.

Lipoma is not a dangerous health problem but grows in size without spreading throughout the body or not forming metastases. These fatty nodes occur inside the body like torso, upper thighs, neck, upper arms and armpits that was caused due to some irregularity on your body (a sign of something went wrong).

Even most of the doctors considered this lipoma as a common small problem but in certain cases when you’re having more lipomas then you have to know what the underlying problem is. There is no exact cause for the occurrence of these lipomas inside the skin. It occurs in people of all ages, most commonly in middle age.

It is also considered as a beauty problem and can be removed from the treatment procedures like surgery, liposuction, and steroid injections. However, all these treatments can shrink Lipoma but won’t destroy it completely. So, it’s best to use some natural ways for treating Lipomas. Apple cider vinegar (ACV) stands best in treating Lipoma without any side effects and cost effective.

Can Apple Cider Vinegar get rid of Lipoma?

  • It perfectly balances the pH (acid – alkaline) levels in the body that in turn helps to clear the lipoma along with preventing its recurrence.
  • It softens the lipoma and reduces slowly the size and thereby its appearance under the skin.
  • It acts as a best remedy for losing weight that results in the decrease of fat deposits in your body.
  • It has essential organic acids, nutrients, pectin, potash and enzymes that raise the metabolism and burns the fat faster.
  • It hydrates and refreshes the body to remove the water retention. It also suppresses your appetite to make you eat less and feel lighter.
  • It helps you with proper digestion, flush out the toxins and other impurities to remove the stored waste from the colon and intestines which in turn helps for not forming any fat deposits.

How to use Apple Cider Vinegar for Lipoma:

Here are the best apple cider vinegar methods that make you understand how to get rid of lipomas without surgery.

Method – 1: (Apple Cider Vinegar)

How to Cure Lipoma using Apple Cider Vinegar

This is a simple method that effectively relieves you from lipomas.

Steps to be followed…

  • Take 1 teaspoon of apple cider vinegar and consume it at night before going to bed.
  • Increase the quantity of ACV slowly from 1 teaspoon to 2 – 3 tablespoons.
  • Be sure to drink it every night before going to bed and continue for 3 – 5 months to get relief from lipoma.

Note:

  • Or if you’re suffering from any irritation while taking ACV directly then add 1 – 2 teaspoons of apple cider vinegar in 1 glass of water and drink it for 2 – 3 times daily to get rid of the lipoma.
  • Alternatively, drink 1/4 to 1 teaspoon of ACV before consuming meals or heavy snacks for better digestion and thereby to prevent the fat deposits on the skin.

Method – 2: (Apple Cider Vinegar with Honey)

How to Cure Lipoma using Apple Cider Vinegar

Drinking ACV mixed with honey mix will definitely help you in reducing the size slowly and thus remove this lipoma or fat deposits.

Steps to be followed…

  • Add 1 teaspoon of raw honey in 1 – 2 tablespoons of organic apple cider vinegar in 1 cup of cold distilled water.
  • Stir well and drink it to get relief from the lipomas.
  • Regular intake of this mix for thrice daily will help to reduce the lipoma quickly.

Method – 3: (Apple Cider Vinegar Ointment with Beeswax and Cedar)

Beeswax and cedar help to soften the lipoma and this combination is very effective in treating lipoma along with providing overall health.

Steps to be followed…

  • Add some beeswax in a pan and melt it properly.
  • Then add dried cedar in this pan and stir occasionally.
  • After few minutes, turn off the heat and let it reach the room temperature.
  • Now add organic apple cider vinegar to it and stir well.
  • Pour this mix in a container and place its lid.
  • Leave it on for few minutes and use it as a lipoma ointment regularly until you get complete cure from the problem.

Note: Or simply mix melted beeswax and ACV in a bowl and use it as an ointment for reducing the size of lipoma and thereby removing it completely.

Tips and Precautions:

  1. Dietary changes will help to shrink this fat deposit or lipoma. So, avoid soy or foods containing MSG and artificial sweeteners.
  2. Always use raw, organic, unfiltered and unpasteurized apple cider vinegar that has the mother for treating any health or beauty problems, including lipomas.
  3. Some users have reported certain side effects like lowering the blood sugar levels, dizziness, heart palpitations and anxiety. So, if you feel any side effects after drinking ACV then stop taking it and consult your doctor immediately.
  4. Drink plenty of water, consume food which is enriched with vitamins and fiber content, avoid sugary foods, do regular exercises, etc. will help you to prevent lipoma now and in future.
  5. It might react with certain medications, so it’s best to consult your doctor before using ACV for lipoma treatment.
  6. ACV might cause tooth erosion and damage teeth enamel, so use a straw to drink apple cider vinegar that helps you not to get any irritation or tooth damage.
  7. The thing to remember that being overweight will not cause these lipomas but it’s best to maintain a healthy weight to get rid of many health problems.

Try this ACV treatment for shrinking lipomas and share your experience with us.

Filed Under: Remedies, Skin

« Previous Page
Next Page »

Footer

DIY Remedies is a participant in the Amazon Services LLC Associates Program, an affiliate advertising program designed to provide a means for sites to earn advertising fees by advertising and linking to amazon.com.

  • Home
  • Affiliate Disclosure
  • Disclaimer
  • Terms and Conditions
  • Privacy Policy
  • About Me
  • Contact Us
Copyright © 2020 · DIYRemedies.org